I recently had a wonderful opportunity for a phone interview with Scott, of Outdoorcookingmagic.com. He's a great interviewer, and our conversation was lots of fun!
Here is the interview in mp3 and transcribed. Go check it out!
Young Chefs: Cooking Skills and Recipes for Kids By Christina Dymock
As a part of the Utah Book Month, I get to Spotlight another Utah author and her book, and I’m very excited about it. The author is Christina Dymock and the book is called, “Young Chefs: Cooking Skills and Recipes for Kids”. As I was perusing her site and the sample pages of her book, it really took me back to helping my own kids learn how to cook.
Those of you who’ve been following the Black Pot here for any length of time know that I haven’t been cooking very long. Only about 7-8 years. Which means that when I started, Brendon, my oldest, was only about 9.
Right from the beginning, he was wanting to help me, and he and I cooked together a lot. My other son, Jacob, has Cerebral Palsy, and so he is often there with me as I cook, but his direct, hands-on involvement isn’t so much as Brendon’s.
Unfortunately, Brendon’s culinary education has been pretty haphazard, as has been my own. We didn’t really have a well-outlined “curriculum” to help us learn. This book would have really come in handy that way. Brendon turned to the world of “Chopped” and “Iron Chef” to learn his techniques. He and his friends would randomly pull “secret ingredients” from the pantry, give them to each other and challenge them to see who could make the tastiest dish from them. I was, sadly, often the judge.
But then, there were other hits, like his Dutch oven Creme Brulee, complete with the torch, and the time I came home from a hard day of work to a fully scratch-made apple pie.
I guess, in the kitchen, as in life, there will always be hits and misses. I just think that with a well-ordered book like this one, with chapters nicely spelled out for main dishes, sides, desserts, breakfasts, and others, with many ideas and pages that teach real skills, there would probably be a lot more hits than misses.
My son loved to experiment with smoothies. His banana grape mint smoothie is legendary at our house. Here’s one of Christina’s:
Sunshine Juice
Serves 6
Ingredients:
1 Cup milk
1 Cup water
1 tsp vanilla
1/2 Cup frozen orange juice concentrate
1/4 Cup sugar
1 Cup ice
What You Do:
1 - Put the milk, water, vanilla, orange juice concentrate, sugar and ice in the blender.
2 - Put the lid on tight.
3 - Blend on Low for 1 minute or until the ice is chopped up.
4 - Pour into cups and serve.
Now, seriously, what kid wouldn’t love drinking this and saying, “I made it!”
Mark has discovered a love of Dutch Oven Cooking. Mark also has other sites and blogs, including MarkHansenMusic.com and his MoBoy blog.
As I've been busy preparing various recipes and bits of text for the books that are coming, and working with the publisher, I thought it would be cool to share some of the other dutch oven books that Cedar Fort (under various imprints) has published. There are a few of these that, as I'd mentioned before, I actually own, and have used, even long before I was found by the publishers.
I've seen a few of the others, too. The ones I own (the Matt Pelton books) are great books, and I'd encourage you to give them all a look-over!
Disclaimer and Disclosure of shameless self-promotion: These are affiliate links. If you click on any of these links and buy a book, not only do you make me money (a small bit), but you also show the publisher that my readers are a force to be reckoned with! In other words, you'll get a great book, I'll make a little coin, and my cred with the folks at Cedar Fort goes up. Win - Win!
I've got a couple more recipes waiting in the wings, and I'll get those posted up here within a day or so. Thanks for your patience!
One of the highlights of my culinary life is the annual International Dutch Oven Spring Gathering (formerly known as the IDOS Spring Convention). This is an evening and day of food and friendship as dutch oven enthusiasts from all over gather to cook and share their love of the black pots. There are demos and classes, and there are vendors and auctions. There’s a camp over the night before with a dutch oven gathering where everyone just kicks back and cooks and shares.
But the part of the event that I love the most is the “Taste of Dutch”. This is where the main area of the pavilion is divided into booths, and each chef or team takes one space. They cook whatever they want, whatever they’ve brought. The doors are opened up to the public, who can browse from booth to booth sampling the fare and interacting with the chefs. Asking questions, swapping ideas, generally having a great time!
Here's what it was like the other years that I went: 2009, and 2008. I also attended in 2010, but (shame on me) I didn’t write it up. Brendon and Jacob were the partners in my booth last year.
It all started for me when Ranes asked me if I wanted to help him in his booth back in 08. We had a great time. I helped him with the Rhodes Rolls that had been donated, and I made biscuits and gravy and a lunch of Masaman curry.
In 2009, I brought a long a friend, Steven Owen, and Brendon made his now famous pizza.
So, I recently got this email from Ranes, about this year’s event:
All,
The Annual IDOS Spring Gathering and Open House (formerly known as the Spring Convention) is on April 8th and 9th at the Legacy Events Center (formerly the Davis County Fairgrounds) in Farmington, Utah.
So, you can participate in many different ways. If you’re a dutch oven enthusiast and chef like I am (I’m tagging you, Andy J, and Toni, as well as many others), and you live in, or can get to, northern UT in April, sign up to be a chef in the Taste of Dutch. The more chefs we’ll have, the more variety, and the bigger the event will be!
If you’re someone who loves outdoor cooking and wants to learn more about using dutch ovens, now is your chance to show up and taste a lot of great free food and learn from wonderful people.
Mark your calendars, ‘cause it’ll be a great time!
Mark has discovered a love of Dutch Oven Cooking. Mark also has other sites and blogs, including MarkHansenMusic.com and his MoBoy blog.
My first encounter with combining fruit and poultry was at a sandwich shop that sold a turkey sandwich with raspberry jam. I was skeptical, but my wife raved about it, so I tried it. In a single bite, I was convinced. Yum!
So, then I saw this recipe for raspberry baked chicken over at Dutch Oven Madness, and it really intrigued me. She said she didn’t like her result, however, and I wasn’t sure why at first. The recipe drew me in, however, and made me want to experiment with it. I thought that one of the reasons why it might not have had a good flavor, as she said, was that all there was to it was chicken and sweet. I thought that there needed to be some savory flavors to add a bit to the chicken, then the sweet and tang of the berries would be another layer of flavor. I did some web research and got some ideas of how to expand it. A couple of recipes used some spices and the berries as a marinade. That sounded kinda interesting.
My results were good, but not great. I liked the taste, and so did my friends, but it didn’t look as great as I’d hoped. The berry marinade ended up as a purple/brown soupy sauce. I also wasn’t blown away by it. It wasn’t as “Wow!” as I’d hoped. They all had seconds, so that was a good sign.
Still, I think that had I done it differently, it would have tasted better. Instead of adding all the ingredients to the marinade, and cooking the chicken, I think I’d make the chicken separate from the berry sauce, and then serve them together. I think that would make the savory and the sweet more distinct. Another thing I think I’ll do differently is to make sure that the chicken is fully thawed and patted dry. There was a lot of liquid still in the chicken, and so the berry sauce ended up too runny, and I had to thicken it with some cornstarch. I was hoping it would be more of a glaze, and that didn’t work.
So, now I’m faced with the dilemma: Do I write it up as I did it, or as I would like to do it next time? Hmmm...
I think I’ll do the latter, this time.
Dutch Oven Berried Chicken
12” Dutch Oven
10 coals below
14 coals above
10” Dutch Oven
12-14 coals below
3-4 lbs chicken breast (I used frozen)
~1 Tbsp olive oil
~1 Tbsp Kosher Salt
~1 Tbsp Pepper
~1 Tbsp Paprika
~ 1 tsp dry mustard
~ 1 tsp chili powder
~ 2 tsp garlic powder
1 cup blueberries + some extra
1 cup raspberries + some extra
1 cup blackberries + some extra
1/2 can of pineapple juice concentrate
1/4 cup honey
Start off with the chicken meat. Since I used frozen chicken pieces, I’d recommend thawing them completely, draining them, and patting them dry in paper towels. Then, mix up the other ingredients. When I did this, I was guessing at amounts. I’m basically creating a rub, so you could even use a pre-packaged meat/grilling seasoning. I kept mixing at about these proportions, tasting with my finger along the way. If you want more of one thing or another, you can adjust it.
Then, coat the meat in in the rub (I used a plastic ziplock baggie to shake it all up), then put it all in the fridge for a few hours.
Get the coals ready, and give your dutch oven a quick spritz of spray oil. Then spread the chicken pieces over the bottom of the oven. Put those on the coals to bake.
Toni, over at Dutch Oven Madness, just used raspberries, I used a mix of berries because the first store I visited didn’t have any raspberries. I did finally find some, though, so I just decided to mix it all in. I added all of the berries and the juice concentrate into a bowl and mashed it all up together. After tasting it, I felt like it needed a bit more sweet in with the sour, so I added some honey. Another thought I had, however, later on, was to use apple juice concentrate instead of pineapple.
At this point, I would do it differently than what I actually did. Instead of blending the berries with the chicken and baking, I’d put the berry mix alone into my 10” dutch oven and put it on the coals to simmer and reduce.
As the chicken nears done, and the sauce is good and thick, I’d stir some full, raw berries into the sauce, so they’d just have enough time to come up to temperature (but not really “cook”) before serving over the baked and seasoned chicken. I wonder how some chopped fresh mint leaves would taste in that sauce.... Hmmmm...
Now, in my mind, that sounds like it would look and taste much yummier than what I got (notice I didn’t take any pictures this time... I will next time!). Like I said, it was good, but not as good as it should or could have been.
So, many thanks to Toni for the inspiration and the motivation to try something new! To experiment! That’s what helps me to learn.
Note from Mark: I tried this one again a few weeks later. Here's the result!
Mark has discovered a love of Dutch Oven Cooking. Mark also has other sites and blogs, including MarkHansenMusic.com and his MoBoy blog.
There are a lot of really good websites out on the ‘net to help out Dutch Oven Chefs, both for beginners and the more experienced. I really enjoy going out and finding new sites, and especially reading more and more posts and recipes. I’ve met some really cool people, both face-to-face, and out on the web.
Here are just some of the other wonderful Dutch Oven recipes and resource websites. Visit them!
Do you remember the Dutch Oven Challenges issued a few months ago by my friend Andy? If not, you can check them out here, here, and here.
Well, over at the Back Porch Gourmet, he's started up a podcast where he interviews those who love cooking outdoors, and he invited me to be his first guest! So, go listen to the podcast!
There are a couple of trends I've been noticing across the intarwebs worlds of breadmaking. One of them is the "No-Knead" breads. These breads seem to have these common characteristics.
The dough is VERY wet and goopy, just on this side of a batter.
They are made with a very long first fermenting, such as overnight or longer.
The dough is handled very little, hence the name "No-knead"
They are baked in a small, enclosed space, to trap moisture and enhance the crust. (Hmmm... Sounds like a dutch oven...)
The crumb structure is full of large holes.
I've been really intrigued with the idea, and have wanted to try it. Matt, over at "One Off", made a loaf, and spelled out the directions so clearly that I thought I'd give it a try. This particular recipe and procedure reminds me a lot of the French Bread I did a while back. It, too, has a long ferment time (a preferment, in fact), and it also uses only the basic four ingredients (flour, water, salt, yeast).
No-Knead Dutch Oven Basic Bread ("Pain Ordinaire" in french)
I started the day before, at about 4:00 in the afternoon, by mixing the ingredients. You might notice that my ingredients are double that of Matt's. He baked his in a terra cotta flower pot, and that's a little tighter quarters than a dutch oven. I mixed the dry ingredients first, whisking them all together, then added the water. Afterward, I adjusted the consistency by adding a bit of flour (if it needs, you could add water instead). From what I've seen and read, you want it to be goopy, but not a batter. It should still stick to the sides of the bowl. It should have enough liquid to jiggle in the bowl, but not be runny.
I covered it with plastic wrap and set it aside on my kitchen countertop.
The next day, at about 11:00 or so in the morning, I saw that it had puffed up very nicely. I put a lot of flour out on my countertop and, with a spatula, dumped the dough out onto it. It immediately flattened out pretty nicely, but I dusted the top with some flour and spread it just a bit more. I picked up both sides, right and left, and did a "letter fold". By that, I mean that I brought one side two-thirds of the way over toward the other side, then folded the second side fully over that. I dusted it with more flour, turned it, and did it again. Then, I did it a third time, just because, I guess.
Finally, I put some parchment paper in a bowl. I picked up the dough (with heavily floured hands) and wrapped it into a boule and set it in the bowl, on the parchment. I set that aside for another rise. The plan is to let it rise for a couple of hours.
After about an hour, I started some coals up. My coals must've been a bit damp, because I had a tough time lighting them. A half hour or so later, I had some lit, but not strongly, and not as many as I'd have liked. Still, I put them under and on an empty, oiled dutch oven to preheat. Meanwhile, I tried to get more coals lit and burning. It just wasn't happening like I would have liked.
At some point I decided that the dutch oven was hot enough and I gently lowered the dough and the parchment into the dutch oven. I folded the remaining parchment over and put on the lid. By then, I had some more coals ready and I added them to heat it up some more.
It baked about an hour or so. When it was done, it looked really great, smelled really great, and, after cooling, tasted really great. There wasn't the big holes, though, in the crumb. I've never been able to pull that off. I suspect it's because the oven wasn't hot enough. I'll try it again really soon, and see if I can make it work.
It tasted really good the next day, too. I don't know how well it will preserve over the week because it's already gone. I guess that's a good sign, right?
Mark has discovered a love of Dutch Oven Cooking. Mark also has other sites and blogs, including MarkHansenMusic.com and his MoBoy blog.
Last month, my pal Andy challenged me to a cookin' duel, cast iron chef style. The rules were simple, We each chose three ingredients and the other person had to make a one-pot meal that included those ingredients. It was a lot of fun, and generated a lot of interest.
So, I'm doing it again. Here are the rules for this round. Most of them are the same, but I'm going to change them up a little bit, however.
It doesn't have to be a one-pot dish. As long as all of the ingredients end up on the same plate, I don't care how simple or complex the process is.
Once again, the players can add any other ingredients they choose, but the final dish must include all three preset ingredients.
The recipe must be your own original creation. Search the web and the cookbooks for inspiration, but do your own thang. Here and here are some good posts on making up recipes.
Rather than require Andy, or anyone else, to come back with a challenge for me, I'm going to also do these same three ingredients.
I'm going to open this one up to everyone that reads this blog. Check out the list, and if you're in on the challenge, cook it up. Then, email me with either your recipe (and pics, if you take any) or a link to where you wrote it up on your blog or website.
So, here are the new challenge ingredients
Meat: Beef (any cut or form of it you want)
Veggie/fruit: Leek, scallion, or green onion, etc...
Spice/flavoring: Cinnamon
I'm also going to post this to the IDOS forums, and see what excitement we can stir up there.
Mark has discovered a love of Dutch Oven Cooking. Mark also has other sites and blogs, including MarkHansenMusic.com and his MoBoy blog.
I've rambled on and on here from time to time about food and cooking as art. Art, in my mind, is basically a vehicle for personal exploration and expression. So, in order for an activity to qualify as art, it has to come from somewhere inside me and teach me something about myself, and then it has to help me share that discovery with others.
I think I've only achieved that level a few times in my culinary life. Frankly, I've only done it a few times in song and even fewer in my efforts at visual art. But nonetheless, it is a challenge for me. That's one reason I keep trying.
One thing that is for certain: it's very difficult to discover something about yourself, and even more so to express that self-awareness when you're cooking someone else's recipes.
This morning, as I was catching up on other people's blogs, I came across a posting on "The Back Porch Gourmet" all about cooking without a recipe. At first, I thought to simply comment on his post, but I ended up thinking too much and so, I posted my own blog entry.
Andy offers some great advice, and I would recommend following it. Here are my own thoughts as well.
Learn from others first
First of all, being the rebel that I am, I took off on my own way too soon. Especially in the world of dutch oven cooking. If I had stuck to cooking other people's recipes for a little longer, I would have learned a lot more a lot quicker. It might not have been as much fun, though...
Second, watch the right cooking shows. Find shows that actually teach you techniques and skills, not just celebs that throw a few ingredients together. Find shows that teach you why these flavors work together and why you need to hold the knife this way.
And don't waste your time watching competitive cooking. "Chopped" and "The Iron Chef" and other challenge shows are edited for the drama of the competition, not for learning new skills and getting cool ideas.
My favorites are PBS's "America's Test Kitchen" and the Food Network's "Good Eats". Alton Brown is like the Bill Nye of cooking. He's teaching you about the science and the art of cooking, while being very fun to watch. Those two are on permanent record on my Tivo!
Start tweaking
Third, learn to hybrid recipes. When you want to cook a particular dish, look on allrecipes.com or recipezaar.com or your old family cookbooks and check out several differing recipes for the same dish. Not only will you learn the different approaches, but you'll pull one idea from one and other ideas from another. In the end, you'll have your own version of a popular dish.
Research helps
...and (Fourth), while I'm talking about recipe websites, another thing I like about allrecipes.com is their ingredient search function. Sometimes, I'm looking in my pantry and my fridge, wondering what to cook in my black pots that week. I'll pull up a few ingredients and think, "Can I make something with these?" I'll jump to their ingredient search function and type in those ingredients. It pulls up a bunch of recipes using those ingredients. I read through them, and hybrid them, and come up with something. This is the process I used, for example, to cook my "Dutch Oven Apple Chicken Curry"
Another way to approach this is with culinary reference books, like "Culinary Artistry". This book is largely a list of ingredients, arranged alphabetically, and following each one is a list of other ingredients and spices that go well with it. Pick what you like, use reasonable amounts, and you've got a whole new dish! I used this approach when I cooked up a Salmon and Potatoes mix.
No fear!
Finally, be willing to experiment, and be willing to fail. Even as recently as last week, I made a pasta sauce for my parents (in the kitchen, not in the dutch ovens), that didn't turn out as well as I'd hoped. Learn from your mistakes. Cooking is actually very forgiving. Many things I've cooked that I've considered to be flops are actually edible, even tasty. They weren't quite as amazing as I'd wanted, but they were still good. I've only cooked a few things that I've had to throw away and pronounce inedible.
Share and share alike
Oh! One other thing! When you do create something new, share it! Post it to a recipe site, or make your own blog. Don't keep it to yourself. And share more than the recipe. Tell us what you learned and how you did it.
Let us share in your art!
Mark has discovered a love of Dutch Oven Cooking. Mark also has other sites and blogs, including MarkHansenMusic.com and his MoBoy blog.
Like I mentioned in my last post, Andy J at the Back Porch Gourmet issued me a challenge in the dutch ovens. We would give each other a list of three ingredients that would need to be used in a completely original recipe. He gave me Pork, Oranges, and Curry. I gave him Fish, Dill, and Potatoes.
The whole idea, as I understand, isn't really to see who's the best. We really can't taste each other's dishes. The idea is just to push us out of our comfort zones a bit and see what we can each do. And to have a little fun in the process. I tried a little trash talk, but really, I'm not too good at that...
I was really feeling out of the zone. It was strange. Since the original challenge stated the the recipe needed to be "wholly original", I didn't even go online for ideas. I just mulled over ideas in my head, and got some great suggestions from Jodi.
Here's my result:
Dutch Oven Orange Curried Pork Chops
12" dutch oven
15 coals below
20 coals above
4 cloves garlic, minced
2 med onions, chopped
5-6 green onions, chopped
4-5 stalks celery, chopped
1/4 cup parsley, chopped
1 can coconut milk
1 canful water
1 canful rice
salt
pepper
Pork chops
kosher salt
curry powder
1 jar orange marmalade
zest of 1 orange
juice of 1 orange
cinnamon
I started out by chopping up and mincing all of the veggie ingredients in the first set. I mixed all of the first set in the dutch oven. Pretty easy, so far.
In the next set of ingredients, I had to make some choices. I wasn't sure whether or not I wanted to put the curry directly on the meat, or include it in the glaze. In the end, I decided to put it on the meat. I rubbed the meat, both sides, with kosher salt and curry powder. Then I layered the pork chops over the veggies, rice, and liquid. I had about 8-9 actual chops, so I had to overlap them in a circle.
Finally, I mixed the marmalade, the zest, the juice, and the cinnamon into a glop and spooned it onto the meat.
I put that out on the coals. It cooked for about an hour. Some of the rice in the middle ended up not fully cooked, so I probably should have gone longer. There was still some liquid that could have been absorbed.
I served it up with a twist of orange, and sprinkled with minced mint leaves.
In the end, it was a really interesting flavor. The rice, and even the meat, had a rich creaminess that I'm sure came from the coconut milk. The spices gave it a very interesting flavor, one that I'd not tasted before, so it was neat to have something almost completely new.
I am throwing down the cast iron gauntlet. I hearby challenge ye to a cast iron duel. If ye choose to accept the challenge, here are the terms:
1. I will choose 3 ingredients:
a. Meat
b. Spice
c. Fruit or Vegetable or Starch
2. Ye must cook a one pot dutch oven dish with the 3 ingredients. Ye may add any additional ingredients so long as they do not nullify these terms. (See number 3.)
a. The ingredients must be as common and available as possible. I do not expect ye to backpack through the mountains of Nepal for the rare Joo-Joo Truffle or some such.
b. The ingredients may be up for interpretation. For example, if I say Chicken, ye may use chicken breasts, wings, nuggets, whatever ye wish. If the ingredient specifically states Rib Eye Steak, then there can be no choosing.
i. Although it states the ingredients may be up for interpretation, meat is meat, so ye may not substitute stock for meat, or eggs for meat, although these items could be added. I will however, consider tofu a 'meat' only because the readers of ye blog may be vegetarian.
ii. No matter who you talk to, ketchup is not a vegetable.
3. It must be delicious.
4. Ye shall hearby document the entire process, including experiences at the grocery store, prepping the dish, cooking the dish, and most importantly, eating the dish.
5. The recipe shall be original in the whole, and the recipe shall be posted for all to see. (see documentation of step 4)
6. Ye shall post the experience on the interwebs for all to see and enjoy.
So, do ye accept the challenge? If so, I would expect to see a counter challenge with a list of my ingredients.
If ye be of valor, here are your ingredients. Choose your weapons wisely.
Well, I'm not one to turn down a challenge. Especially from a knight so brave and skilled as Sir Andrew. I quickly responded with this missive:
Andy,
Sorry, I'm lagging way behind. This is a GREAT idea. Your challenge ingredients look fun, too. It might be as much as a week or two before I get to cooking it, though. Is that OK?
Here are your ingredients:
a. Meat: Fish
b. Spice: Dill
c. Fruit or Vegetable or Starch: Potatoes
The only downside here is that we really should get together and cook these challenge meals, then sample each other's dishes. I just don't know when we could do this.
Mark
Well, we discussed (via electronic carrier pigeon) the possibilities of staging this fated duel face to face, but soon realized that it was a futile effort. We must cook, each man in his own fair land, and the fame of our heated cast iron battle will needs be shared far and wide in song and legend.
So, a few days ago I was in the grocery store, and I started checking out pork, to see if anything inspired me. I did come to one conclusion: Pigs is Pricey! I thought about getting a pork roast, and then pulling it and serving it over a rice/orange/curry kinda thang. That sounded good, but that made it a two-step, instead of a one-pot meal. I probably coulda gotten away with that, but in the end I decided I'd go with some pork chops.
I'm still not too sure how I'm going to do it. I've got some ideas that I think are really cool, but I'm not certain. One thought is an orange curry kinda glaze thing, and probably still over rice. It might be cool with an orange marmalade... Hmmmm...
At any rate, my plans are to cook it up this weekend, probably Sunday. As always, I'll keep you posted!
Mark has discovered a love of Dutch Oven Cooking. Mark also has other sites and blogs, including MarkHansenMusic.com and his MoBoy blog.
As I was checking around my blog, I noticed a link back from a blog called "Too Many Hobbies, Too Little Time." I've actually followed this blog for a while. I can relate to the title.
Anyway, he'd linked to my sourdough bread page, and I checked his post out, and found instructions for making bread in the outdoors.
Now, when I do my bread, I knead it, raise it, and prep it all indoors, and cook it on my back porch. I've wanted to figure out how to do it in the great outdoors, so I was glad to find this. I will try it soon, and see what we find.
Mark has discovered a love of Dutch Oven Cooking. Mark also has other sites and blogs, including MarkHansenMusic.com and his MoBoy blog.
Now that Christmas is over, I can write about one of the things I did.
I got this idea that it would be cool to make some flavored olive oils and give them to some of my cookin' friends as Christmas gifts. I did a bit of research and found some cool flavor combinations, and I settled on three: Cinnamon and nutmeg, Italian seasonings, and Chili and onions.
I had a very difficult time finding bottles for the whole adventure. I wanted the ones that have the little metal spouts. The ones I found had a hard time gripping once the bottle neck got oily. But I eventually discovered that once you've poured in the oil, if you dry of the inside of the neck really thoroughly with a paper towel, the rubber in the stoppers sticks again. So, I was good to go. I got the bottles at a dollar store, so I the biggest expense really was the oil.
Ooops.
Those that got them for Christmas are probably reading this.
I mean... I spent hundreds of dollars each on those antique hand-crafted crystal masterpieces. And I grew the olives myself and pressed the oil in my back yard. Yeah, that's the ticket...
I made three sets of the three oils, so that I could give one to John, of Mormon Foodie fame, one to my sister (who gave me the sourdough start I mentioned last time), and keep one for myself. I started off with the cinnamon one. I simply put about 2 teaspoons of nutmeg in the bottom of the bottle, and then dropped in a couple of sticks of cinnamon bark. Then I poured in the oil. Finally, I wiped dry the inside of the neck and put on the cap. It was that simple.
For the italian style oil, I got some sprigs of fresh herbs (basil, thyme, and oregano), and then bruised them up a little bit. I'd read that allows for more infusion of flavor. I put them into the bottle. I sliced up a couple of cloves of fresh garlic for each bottle, and put in some dried tomatoes. Then those got filled up with oil, cleaned and capped.
The chili one was also very easy to make. I'd bought some thin red chilis (dried) in the mexican section of the supermarket. I also sliced up some pearl onions and added those in. Then, in went the oil.
I'd read that you want to wait at least three weeks for the flavors to infuse before you use the oils. I made them the week before Christmas, so that means at least one more week before using them. I may go longer, though. It was a lot of fun to make! And I think they looked really classy, even if they were dollar store bottles. I mean--priceless antiques...
Hey, folks. Over the last little bit, I've encountered a few new Dutch oven bloggers!
These are folks that are just starting out in the obsess--I mean--"hobby", and are posting their efforts, their learning and their recipes. They're tackling some pretty challenging stuff, too. So, here at the Black Pot, I'm throwing them some link love!
It all started with my friend, John, reminding me that St Paddy’s was comin’ up by posting a recipe for Irish Soda Bread at his MormonFoodie.com blog.Like him, I have very little Irish in me.Both my mother’s lines (Utah Mormons from way back), and my wife’s dad’s lines go back to wales.That’s about as close as I get.
But that’s OK, because come March 17th, EVERYONE becomes an honorary green-wearing, shillelagh-swinging, rainbow-gold-chasing, jig-dancing, shamrock-wishing Irishman.It’s the law.
As I was looking up recipes for Corned Beef and Cabbage, I found a lot of them that said, basically, just buy a roast of corned beef, add the spice package and boil it with some potatoes and cabbage.Well, where’s the fun in that?So, I did some research to learn how to cure the corned beef myself.
I found a lot of variations.Basically they all involved rubbing the meat in a lot of salt and a few spices and letting it sit in that for a week or so in the fridge.The research I saw said that this was a more traditional method, and a more modern approach involved soaking it in brine.Some said you had to do it for 72 hours, others said a week, some said as much as two weeks.I’m going for the week-long salt/spice rub, because that both sounded yummy and matched my time frame pretty well.
So, I chose a recipe and shopped out the few ingredients I didn’t already have.
4+ lbs of some kind of beef roast
1 ½ cups coarse salt (I bought some kosher salt)
¾ cup brown sugar
3 crumbled bay leaves
1 Tbsp mustard seed
1 tsp whole peppercorns
1 tsp allspice
1 tsp nutmeg
1 tsp coriander
1 tsp ground ginger
I mixed together all the spices, salt, and sugar in a bowl.Then I opened up the meat, and stuck it with a sharp knife, to make sure it was really dead.No, actually, that was so that there were plenty of holes for the spices.I put the meat in the bowl and coated it, then grabbed the spice mix with my hand and rubbed it into the surface of the meat pretty thoroughly.
Then I put the coated meat into a big ziplock baggie and poured in all the spice mix that didn’t stick to the meat.I sealed, then shook the bag to coat it even more.Finally, I got as much air out as I could, and sealed the bag again, and put it in a bowl in my fridge.
I also found out, in my research, why it’s called “corned” beef, when there’s no corn in the recipe.It seems that in the days of olde, when they’d prepare the salt and spices, it would clump together into kernels about the size of corn.Then it would be rubbed onto the meat.
I also learned that pastrami is essentially corned beef that, once it’s cured, is coated with its own spices and peppers.So, maybe I’ll take a bit of this corned beef and make some pastrami with it.
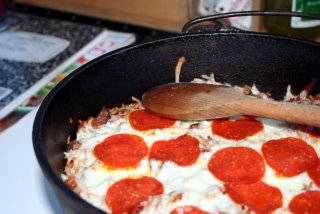
I’ve been wanting to try this one for a long, long time, but a lot of things got in the way. First, I had a hard time finding the pesto sauce. Then, I was missing this or that ingredient, or I didn’t have time to cook, etc…
But the idea just seemed so bizarre-ly cool that I had to try it. I originally saw it at the “Round the Chuck Box” blog, and here is the direct link. The picture below is his, but mine turned out looking pretty much the same.
I just shortened the name from “Deep Dish Pizza Rice Entrée” to: “Pizzarice”. I did tweak the recipe a bit, too.
Pizzarice 10” DO 6 briquettes under, 13-15 above, once the baking begins
8 ounces Italian sausage 1 cup chopped onion 2 cloves garlic, minced 1-1/2 cups long-grain rice 4 ounces sliced pepperoni, cut into quarters 1/2 cup sun-dried tomato pesto 1 teaspoon dried oregano 2-1/2 cups chicken broth 1-1/2 cups shredded mozzarella cheese Some more ordinary round pepperoni slices
I started by arranging a lot of briquettes under my 10” and a little less under my 8”. In the 8”, I put 2.5 cups of water, to heat or boil to dissolve a couple of chicken bullion cubes into.
In the 10”, I crumbled the sausage and started cooking it. I like to use mild or medium sausage. I like hot sausage, but in dishes I’ve found that hot tends to overpower the rest of the flavors, and all you taste is sausage. In this case, I couldn’t find any medium, so I got mild. For Italian recipes, I like Italian sausage better than ordinary pork breakfast sausage. But use whatcha got.
Once the sausage was cooked, I added the garlic and the onions and cooked those until they were translucent.
By this time, the water was hot enough to dissolve the bullion cubes. So, I pulled the 10” off the coals and added the rice. I stirred it to coat the rice in oil. I don’t know why. The recipe said so. Maybe some of you know and can tell me why.
Then I added the broth, the pesto sauce, and the pepperoni chips. Oops. I just realized I forgot the oregano. Oh, well, the recipe says you should add it at this point. Then, I stirred it all up.
I set up the coals as above and put it on for about 20 minutes. At that point, I spread on the mozzarella (actually I bought a shredded blend of pizza cheeses, including provolone, romano, and parmesan as well as mozzarella), and I topped that with some more pepperoni rounds.
Back on the coals for about another 10 minutes, and we’re good to go!
Wow, that’s good! I’ve had a little trouble with rice dishes of late. This one is cooked perfectly. I think my troubles have been not enough liquid for the rice to absorb.
Tomorrow, my parents are coming over, along with my Dad’s brother, and my mom’s sister. What’s on the iron? Lemon salmon on rice, with rolls on the side! Oh, yeah…
I admit, I need another blog like I need another hole in my head. But that never stopped me before, right?
But I was inspired by my good friend over at "Confessions of a Mormon Foodie". I've enjoyed reading his thoughts on eating, and I've also enjoyed talking them over with him. So, I'm sharing my own experiences.
The setup:
Last Father's Day, my wife bought me a single 12" dutch oven. I'd always wanted to learn how to do it, so when she did that, I jumped right in. I got a few books, read up a little, and found some websites and started. I seasoned the oven, and one sunday afternoon, I made pizza. I'd had fond memories of having dutch oven pizza as a young boy scout, so I did it.
And it turned out GREAT! I was hooked. I started a tradition of doing our sunday dinner in the back yard. Rain or shine, summer or winter. I've missed a few weeks where I've been sick, or out of town, and there've been some dishes that have been less than spectacular (like my first attempt at an apple pie - yeesh).
But still, I've had some real hits.
my Lemon Salmon and Rice is a favorite
I did our Christmas Turkey (with a delicious herbal baste my wife found on the net)
Our Easter Ham (with a cola-based baste - hey, that's poetic!)
And, most recently, the successful apple pie.
Here's a picture, by the way, of the most recent pie:
So, here's where I'll be posting my experiences with my black pots each week. Recipes, tweaks, successes, failures. Just for fun, and a cool place to archive all my work. We're in for a tasty ride!