Showing posts with label poultry. Show all posts

Sunday, February 25, 2018

Mediterranean-style Layered Chicken in the Dutch Oven

This dish was inspired by a lot of Italian and Mediterranean flavors. The layering of the the ingredients helps to keep the flavors a bit more distinct, whereas they would be more blended if they cooked as a stew or casserole. It’s an easy to make one-pot meal, with meat, veggies, and dairy all mixed in. If you serve it with some bread sticks, you have your grain/starch right there. It was way yummy!

When I did this for my family, I sauteed some yellow and zucchini squash slices in another dutch oven as a tasty side dish.

Mediterranean-style Layered Chicken

12” Shallow Dutch oven
10 coals below
16-18 coals above

10” shallow Dutch oven
10-12 coals below

  • 2 lbs boneless, skinless chicken breast
  • Salt
  • Pepper
  • Paprika

  • 3x 14 oz cans diced tomatoes
  • Oregano
  • Parsley
  • basil
  • Salt
  • Pepper
  • Garlic powder
  • Cayenne (just a little)
  • Lemon juice


  • 1 lb ricotta
  • 1/2 cup parmesan
  • 2 medium Onions


  • 2x 14 oz cans Artichoke hearts
  • 2x 14 oz cans olives
  • Fresh Parsley
  • Green onions
  • 16 oz grated mozzarella


While the coals were getting hot, I started by prepping the food for the layers.  I began by blotting the thawed chicken breasts dry, then cutting them into 1” cubes. I seasoned the cubes with the salt, pepper and paprika, which is my go-to meat seasoning.

Then, I made the tomato mix by opening up the cans of diced tomatoes and adding in all of the seasonings in the second set of ingredients. I was pretty liberal with the flavorings, except for the cayenne, and I tasted all along the way, just to make sure that the balance of seasonings was good. Next, I mixed the ricotta and the parmesan cheeses. I actually added some feta in, too, because we had some. After that, I sliced the onions (in circles).

The last prep step was to assemble the layers in the Dutch oven. I started by spreading about a third of the tomato mix over the bottom of the Dutch oven. Then, I added these layers, in order, assembling upward:


  • Artichoke hearts (drained)
  • Olives (drained)
  • Chicken cubes
  • Cheese mix
  • Onion slices
  • The rest of the tomato mix
  • Minced fresh parsley/green onions
  • And finally, a layer of shredded mozarella


Here are some pics:


Once it was all assembled, it was just a matter of putting it on the coals and baking it for about 45 minutes. I kept some fresh coals going in the chimney and replenished the coals on the oven about every 15-20 minutes.

While it was baking (in fact, when it was almost done), I put the 10” Dutch oven on the coals, with a little olive oil in it. I sliced a couple of zucchini and yellow squashes each, and tossed them into the heated oil to sautee with a little salt and pepper. I only cooked them for about 10 minutes or so, just long enough to get hot and a little soft, but still be crispy.

Then, it was ready to serve!


Mark has discovered a love of Dutch Oven Cooking. Mark also has other sites and blogs, including MarkHansenMusic.com and his MoBoy blog.

Wednesday, May 25, 2016

Dutch Oven Roast/Braise Turkey

I’ve enjoyed cooking turkeys for celebration for a long time. Christmas, Thanksgiving, Easter, etc... One thing I really like about turkey is that there are so many ways to cook it. Roasted, deep fried, smoked, etc, there are a million ways. I was surprised, then, to hear about another, different, way to do it in the Dutch oven. A roast/braise!

A braise is where meat is cooked in a certain amount of simmering liquid. It’s usually done in smaller pieces. In this case, I did the entire turkey, and combined the techniques of roasting and braising.

14” Dutch oven

14-16 coals below
16-20 coals above


1 10-12 lb turkey
Salt
pepper
paprika
garlic powder
oregano
parsley
rosemary

4 cups apple juice (with no additional sweetener)
juice of 2 lemons
4 cups water or stock

zest of the lemons
4-6 potatoes, sliced
4-6 stalks celery, diced
3-6 medium onions, diced or sliced
2-4 sweet peppers, diced
3-5 cloves garlic, minced

I started out with the turkey, thawing it overnight. Usually, I’ll brine a turkey by putting about half to 3\4 of a cylindrical package of salt into a drink cooler, along with a 16 oz pac of brown sugar. I put in a little hot tapwater and dissolve it, then add a lot of cold water, enough to float and cover the turkey. Then I’ll soak that overnight, thawing and seasoning the bird.

I did that this time, but, because of the braising, I’m not sure it’s totally necessary to brine. It does need to be thawed, however.

The next day, after lighting up some coals, I drained the turkey and patted it dry. I also pulled out the neck and giblets. Usually, I save these for stockmaking.

I got out the Dutch oven and put the turkey in, resting it right on the base of the oven. I sprinkled on pretty liberal amounts of the seasonings and herbs listed above, and rubbed them into the skin. I put the lid on and set the Dutch oven to the coals.

Much of the effort in cooking this dish is maintaining the heat. It was cold out, so I spent much of my time indoors. I used a timer set for every 20 minutes to remind myself to refresh the coals on the oven, and replenish the coals in the chimney.

Once the oven was heated up and cooking, I prepared the braise. I started by zesting the lemons, because it’s very hard to zest a squeezed lemon. Then I mixed the apple juice and lemon juice. I mixed gradually, tasting along the way. I wanted a good balance between the acid and sweet. Once I’d found it, I poured it into the Dutch oven and added the water. You could use stock, but I found the cooking turkey turned the liquid into a pretty rich stock anyway.

After about 2 to 2 1\2 hours of braising and roasting, the turkey was at about 150 degrees. I chopped up the veggies in the next set of ingredients, stirred them up, along with the zest, and added them to the Dutch oven on either side of the turkey.

Adding in all those veggies will, of course, throw off the cooktime. After about another hour, the turkey was approaching 160. That’s getting close to done, but I find that I’m more certain of done-ness at about 175 or even 180.

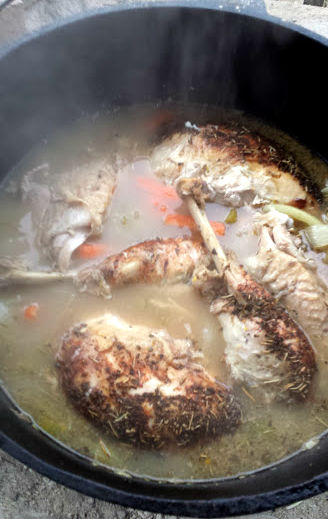
Here’s where the full braising comes in. I took the bird out of the Dutch oven (carefully, to keep it intact) and did a very basic carving. I cut off the legs and the thighs, and separated them. I sliced the breasts off in chunks. I took off the wings, too. I could see, as I was carving, that the meat was juicy, succulent, but not quite fully done.

That was fine, because the final step was to lay the meat back in the Dutch oven on top of the broth and veggies to do a full braise.

At that point, it’s a good idea to start setting the table, because it will probably only need another 30 to 45 minutes to get to full doneness.

Oh, let me tell you, when you serve up the sliced meat in a bowl with the veggies and the flavored broth, it is incredible!

And you can use the bones and remaining meat with the neck and giblets for stock.


Mark has discovered a love of Dutch Oven Cooking. Mark also has other sites and blogs, including MarkHansenMusic.com and his MoBoy blog.

Saturday, September 26, 2015

Simple Dutch Oven Roast Chicken

Roasting a chicken in a Dutch oven is a very easy thing to do. It looks complex but it’s not. The end result is delicious and an easily feed a family, probably even with a little left over.

I did this a couple of weeks ago, and reminded myself how wonderful and impressive this is.


12” Deep Dutch oven
10-12 coals below
14-16 coals above

1 whole chicken (thawed, if you bought it frozen)

salt
pepper
paprika
dried parsley
dried rosemary
dried sage
a touch of crushed red pepper
oil

2-3 large potatoes
2-3 medium to large onions.

1 14 oz can green beans (optional)
1 14 oz can whole corn (optional)


First, I got the coals lit, and let them start to get white and hot. Then, I got the chicken ready.  I opened the package and let the chicken drain. I rinsed it off, then padded it dry with paper towels. poked the skin over the breast and the legs with holes so that the juices and flavors could penetrate the meat.

I sprinkled on the seasonings of the second set of ingredients, then drizzled on a little oil. I rubbed that over the surface of the chicken. I don’t list amounts here because I didn’t really pay attention to that as I was sprinkling them over the bird. Just be liberal. Except with the red pepper. Be more cautious there, if you don’t like heat.

If you’re the more precise type of chef, you could mix the spices as a blend first, tasting along the way, to get the exact blend you want.

Then, I cubed up the potatoes and the onions into 1” or 3/4” blocks and tossed them into the bottom of the Dutch oven. This will help flavor the dish, and lift the chicken up above the heat and the juices as it cooks. Plus, the potatoes and onions make great sides to add to your plates.

I put the dutch oven onto the coals, and started cooking. This is a fun kind of cooking, because I sit there and watch the coals burn. All the while, I can tell people, “Don’t bother me, I’m cooking.” Great times. Actually, it’s not a bad idea to stay with it, because you’re going to need to replenish the coals from time to time.

I cooked it for about 2 hours, total. I cooked it to an internal temperature of 175-180. In a traditional indoor oven, cooking it that long will usually dry it out. But in a Dutch oven, the juices are all trapped under the heavy lid. I cook it that long because then not only is the meat done and tender, but it also falls off the bone and the connecting tissue is broken down.

If you want some veggies as a side dish, the easiest way to do that is to drain a can of green beans and a can of corn, mix them together and pour it around the sides of the chicken when there’s only about 15-20 minutes left in the cooking.

An even better option would be to use fresh beans and fresh corn. If you do that, snap the beans, and shuck the corn. You could either cut the corn off the cob, or break the cobs into short lengths. If you use fresh veggies, add them when there’s 30-45 minutes left in the cook time.


Mark has discovered a love of Dutch Oven Cooking. Mark also has other sites and blogs, including MarkHansenMusic.com and his MoBoy blog.

Dutch Oven Artichoke and Veggie Chicken

My wife and I recently got invited to attend an awards dinner. Unfortunately, we weren’t the ones receiving any awards. Oh, well. Someday, I’ll get to thank the Academy and all the little people that have helped me along the way...

:-)

But the dinner was great! It was this delicious chicken breast surrounded by veggies. It had a bit of citrus and acidic twang to it, too. So, I thought I’d give it a try in my Dutch ovens, along with some variations. These mostly come in the form of the various veggies you can add in, depending on what you’ve got.

I decided to serve it all on a bed of brown rice, which was also different from the formal dinner we attended.

12” Dutch oven
24+ coals below for searing stage
10-12 below for baking stage
24-26 above

8” Dutch oven
12+ coals below

6-8 boneless skinless chicken breasts (we buy them frozen in a bag). Make sure these are well-thawed.
Olive oil
Salt
Pepper
Paprika
Garlic powder
Dried parsley
Dried oregano
2-3 medium to large potatoes
1-2 medium to large onions

Vegetables to put on top
1 bottle or can (about 14oz) brined or pickled artichoke hearts
15-20 cherry tomatoes
2-3 stalks celery
2-3 carrots

1-2 lemons

2 cups brown rice
4 cups water
a cube of chicken bullion
salt

The first step was to prepare the chicken, which I did while the coals and the Dutch oven were getting hot. I made sure that the chicken was well-thawed, and pat dry with paper towels. One problem with chicken breasts is that the middle is much thicker than the edges, so it’s a little more difficult to regulate the cooking. If I were to do this again, I would pound the chicken a little thinner with one of those meat tenderizer mallets. Not so flat like you do for a cordon bleu or some other kind of roll-up, but just so that it’s not so thick in the middle.  Then I drizzled on some oil, and rubbed in the spices and herbs, onto both sides.

I put a lot (a couple of dozen) of coals underneath my Dutch oven, and I let it get really hot with a little oil drizzled on the bottom.

Once it was hot, I set in 3-4 of the breasts and let them sear a little on each side. Then, I pulled those out, let the Dutch oven heat up again (you might even want to replenish the coals) , and I finished the remaining 3-4 breasts. They should have a little brown and the spice rub should be nicely cooked on. It’s OK if it’s not cooked all the way through, though. We’re going to bake it still.

Then, I set up the Dutch oven with the coals configured for baking (the second set of numbers above). I cubed up the potatoes into large chunks about 3/4” to 1” big. Then I cut up the onions into big 1/8th chunks. By that, I mean, I cut each onion in half, and then each half into quarters. All of these got tossed into the bottom of the Dutch oven and stirred up a bit, to coat with the oil.

On top of that, I layered the browned chicken breasts, and I arranged them so that they were overlapping as little as possible. I put on the lid and put on the coals for baking.

Then I started slicing up the other veggies. They should be sliced thin, on the bias, if possible, so that there isn’t much thickness and they can cook more quickly. I chopped and diced the artichoke hearts coarsely, just to make the bits a little smaller. I cut the cherry tomatoes in half once. Then, I scattered all of these over the chicken breasts. I poured the artichoke brine over the chicken as well, and, after zesting one of the lemons, added the zest and the juice of the lemons as well. I let that cook for about a half hour.

Making the rice is easy, too. I added the rice, the bouillon, salt, and the water to the Dutch oven and set it, with the lid on, on the coals specified. I watched for it to start venting steam out from the side of the lid, showing me that it was boiling. I gave it about another 10-12 minutes before removing it from the coals. Without lifting the lid, I just set it aside to cool down and to finish cooking. I let it go for quite a while, because brown rice takes longer to cook than white rice. I had to resist the temptation to lift the lid and check it! I wanted the steam to stay in and cook the rice.

When it was all done, and time to serve, it smelled delicious, and looked great. I spread a bit of rice on the plate, then added the chicken breast and the veggies. I scooped a bit of potato and onion onto the plate, too, then drizzled some of the broth liquid from the bottom of the Dutch oven over the entire entree. It was a great meal!


Mark has discovered a love of Dutch Oven Cooking. Mark also has other sites and blogs, including MarkHansenMusic.com and his MoBoy blog.

Wednesday, March 5, 2014

Dutch Oven Chicken Artichoke Soup

There are a few ingredients that you can use in a dish that will immediately class it up.  It almost doesn’t matter how you use them, just the fact that it’s in there (and in the title) will immediately make foodies like me sit up and take notice.  Without it, the dish is pleasant, but with it, the plate becomes a gourmet delight!  A well-seasoned and grilled chicken breast is nice, for example, but if you put steamed asparagus next to it on the plate, it gets an extra start in the rating, right away!

Artichoke is another one of these.

About two weeks ago, I had this germ of an idea for a dish with a chicken soup and a fresh half artichoke.  I started looking at various artichoke soups online, and most of them involved canned or bottled pickled artichoke hearts, veggies, and broth, then simmered and pureed.  So, what you got was a thicker, creamier sort of soup.

That sounds great, but it wasn’t what I was imagining.  In fact, I couldn’t find anyone who had done what I had in mind. That was encouraging, but it also made me nervous.

Dutch Oven Chicken Artichoke Soup

12” Dutch oven

20-24 coals below

1 Tbsp Oil
1 can mushrooms or 1 cup fresh mushrooms, sliced
3 cups cooked chicken, shredded or cubed
2 medium onions, sliced
3 stalks celery, chopped
2 sweet peppers. diced
4-5 cloves garlic, minced
Salt

2 Tbsp Oil
4 tbsp flour

1 cup milk
4 cups chicken stock
Juice and zest of 2 lemons
Parsley
Oregano
Salt
Pepper

3 artichokes

This soup is built up in steps, or layers.  First, I browned and sauteed the veggies to get the maximum amount of flavors.  I did that in the best order, so that those that cook longer start first.  Then, I made a roux to help thicken it, and created the soup.  Finally, I added the artichoke halves to cook while the soup simmered.

To get started, I put the 12” Dutch oven on some hot coals, with a little puddle of oil in the bottom.  I let that heat up for about 10-15 minutes.  While that’s happening I prepared the chicken and the veggies.

A word about the chicken.  I had some pulled chicken from when I made some stock a bit ago.  After eating a roast chicken or turkey, I boil the remainder (the bones and the rest of the meat), and the liquid becomes stock for soups (see below).  I also pull the remaining meat off the bones, and shred it for things like this, or for enchiladas, or sandwiches.  For this meal, you could also used canned chicken chunks (well drained and dried), or even cubed fresh chicken.  If you use the fresh chicken, you’ll cook it a bit longer in the first step, of course.

When the Dutch oven was hot, I tossed in the chicken and let that sear.  I added in the mushrooms, and let them cook down.  I really like the mushrooms when they’re quite browned.  Finally, I added in the other veggies.  All the while, I tossed and stirred everything frequently.

Once the veggies were getting a bit soft and the onions were translucent, I pushed everything aside and made a space in the middle of the Dutch oven.  In that, I added more oil, and the flour.  Immediately I stirred that into a roux and let it cook, stirring, until it started to smell a bit nutty. It was still quite light, a blonde roux.  I mixed everything together.

Then, I stirred in the next set of ingredients, the milk, the stock, the flavorings.  As always, you can use the flavors and amounts that you like.  I put the lid on, refreshed the coals, and brought it up to a simmer, for about 15 minutes.  I tasted and adjusted.  Artichoke has some bitter tones, so the acid in the lemon juice goes a long way toward lessening that and livening it up.  Make sure you have enough.  Vinegar could also be used.

While it was simmering, I prepared the artichokes.  I cut them in half, across the stem, so that each half was like a floral bowl.  I trimmed off a few of the lower leaves.  I got a paring knife and cut and scraped out the “choke” which is the fuzzy stuff in the heart.  I also cut out the first couple of layers of innermost leaves, just to make sure that I got everything.  Then, I put those into the soup.  I pushed them down in, and ladled some soup over them, so that the soup would get down, in between the leaves.  I set the timer for 45 minutes, and put the lid back on.  During the 45 minutes, I just adjusted the coals, and occasionally checked and stirred.

When it was finally done (a leaf of the artichoke came off freely), I brought it in to cool.  I served it up by lifting an artichoke half into a bowl, then ladling the soup around it.  I served it with some Pita wedges to dip into the soup.  We ate it by pulling off the leaves and scraping the flesh at the bottom of the leaf with our teeth, and then sipping the soup with a spoon.  It was delicious!


Mark has discovered a love of Dutch Oven Cooking. Mark also has other sites and blogs, including MarkHansenMusic.com and his MoBoy blog.

Friday, January 3, 2014

Christmas Dinner: Part 1: Bacon-Draped Turkey in the Dutch Oven


This holiday season has been quite a hectic, crazy one.  Between my son’s knee surgeries and my general work schedule, I’ve barely had time to think.  I still got out and cooked in my Dutch ovens, but I just haven’t been writing about it.  I’ve got a backlog of recipes to catch up on!

I thought I’d start with Christmas dinner.  Since family parties and obligations meant that I didn’t do a Thanksgiving turkey this year, I thought I’d do it for Christmas.  A neighbor, in his kindness gave us a 13 lb hen, and I roasted it up.  I really like the smaller turkeys.  Not only do they fit in the Dutch oven better, but they’re more tender and juicy, I think.  I did this one a new way, draped in bacon.  It was delicious.  Here’s the process:

14” Dutch oven

14-16 coals below
20-22 coals above

1 12-14 lb Turkey hen
13 oz salt (about half of a 26 oz carton)
1 1 lb brown sugar
Water to cover

2-3 large potatoes
2-3 Medium onions
Salt
Pepper
Cayenne Pepper
1 lb sliced bacon

A few days before the big day, I started thawing the turkey. The best way to do that is to move it from the freezer to the fridge. We were having 30-40 degree days, so I just set it in the garage, still in its plastic packaging.

The night before cooking, I set up the brine.  This is going to be an overnight soak in a salt water solution to tenderize the meat and give it a bit of tang. I usually do this in a travel cooler. The best I’ve found is the large, round drink coolers. But use whatever you’ve got. I started by putting in about 2” of hot tap water in the bottom. To that, I added the salt and the sugar. I stirred this all up and got it as dissolved as I could. Then, I added a few more inches of cold water, stirring as I went.

I unpacked the turkey and stuck a lot of holes in the skin all around with a paring knife.  This helps the brine get more into the meat. I set it in the water (which actually looks really gross with the brown sugar in it), and then poured in enough water to cover the turkey.  As a last bit, I usually add in some ice. I always do that in the summer so that it stays cool overnight. In the winter, I just let the cold of the night in the garage keep it the right temperature.

By morning it was nicely brined and evenly thawed, ready for the fire.

Since this was to be served in the early evening, I started preparing it at about 11:00.  I first cubed up the potatoes into one inch blocks and tossed them around the bottom of the lightly oiled Dutch oven. The onions, too. You could add more veggies if you wanted, like celery and carrots. The point of the potatoes is to lift the turkey up above the juices that cook out. Then I went out and lit up a chimney full of coals.

I set the turkey onto the potatoes and onions. Then I sprinkled some salt, pepper and paprika over the upper surface of the bird.  After it was roasting, I thought it would be kinda tasty to have layered the top with honey. If you try that, let me know how it turns out.

Finally, I simply draped the bacon strips over the top of the turkey.  There were sufficient strips to layer them twice, once across the chest, and once on lengthwise. Once that was done, it was time to start roasting!

I went out and set it on the coals. Typically, when roasting, you do the same number below and above, but I usually go a few more above, just because heat rises. And where it’s winter and there was a breeze to blow away some of the heat, I went with that.  I wasn’t shooting for too hot of a roasting temp, about 350°F. Lower than that will just make for a slower roast, which tastes better anyway.

At that point, it was just a matter of keeping the Dutch oven hot with fresh coals.  Like I said, it was a bit breezy, so the coals burned a bit quicker. I like to do my turkeys to an internal temperature of between 170 and 180°F, just to make sure that it’s done all the way through.  The seasonings and the bacon combined to a nice flavor with supplemented the turkey without overpowering it.  It was a great centerpiece for the Christmas meal!

Mark has discovered a love of Dutch Oven Cooking. Mark also has other sites and blogs, including MarkHansenMusic.com and his MoBoy blog.

Tuesday, July 23, 2013

Dutch Oven Tandoori Chicken

This is one of those times when you know you’re not going to get it right, but you also know that you can get it good.  I saw this recipe online for doing tandoori chicken in a regular oven.  I knew that it doesn’t really work the same.  A Tandoor is a very specialized kind of oven with very high dry heat.  You marinate your whole chicken in spices and then skewer it and stick it down the throat of this round, tapered clay oven.  A home oven just won’t do it authentically.

But then, I realize that it might not be true, authentic tandoori chicken, but the spices will still glaze on the chicken and it will still taste great.

Once I’d lost the worry about authenticity, it was an easy mental jump to do it in the Dutch oven.  There was one problem, however: the dry heat.  In order for the marinade to glaze on, I would need very high and dry heat.  I’ve done that a lot of times with the “lifted lid” or “dry roasting” technique. So, we’re good to go!

I did two whole chickens, but the marinade could be halved to make just one.

Dutch Oven Tandoori Chicken

12” deep Dutch oven

Phase one: roasting
12-14 coals below
14-16 coals above

Phase two: dry roasting
12-14 coals below
24-28 coals above

8” Dutch oven
10-12 coals below

2x medium roasting chickens, whole, no neck or giblets


1 cup plain yogurt
1 6 oz can tomato paste
Juice and zest of 1 lemon
1 tsp hot chilli powder
1 tsp turmeric
1 tsp ground coriander
1 tsp ground cumin
2 tsp garam masala
1 tsp ground cinnamon
2 tsp ground ginger
2 tsp garlic powder
salt
pepper

2-3 medium yellow onions
2-3 lemons

13.5 oz can coconut milk
1 Tbsp corn starch or flour


The first task is the marinade, and I did that the night before.  I simply mixed the yogurt and all of the spices and flavorings of the second set of ingredients in a bowl.   Then,  I opened up the chicken bags, drained them and patted them dry.  I also pulled out the neck and giblets.  I got out a sharp slicing knife and made some cuts across the breast and the thighs and legs.  This is so that the marinade can get down under the skin and even more into the meat.

I saved the big plastic bag that the two chickens had come in, and put them back in, pouring all of the yogurt and spices on top.  I worked the bag so that the marinade covered all of the surfaces of the chicken.  You could just put it in bowl and rub it all over, finally covering it with plastic wrap.  Coating the marinade on the chicken is a very, very messy task.

I put the coated chicken back in the fridge overnight.

When  the time came to start cooking, I lit up some coals, and got out my 12” deep.  At first, I was a little concerned that the chickens might not fit, and that I’d have to use a 14”.  In the end, it was fine.

I halved each onion and then quartered each half, and tossed the wedges into the bottom of the Dutch oven.  I did the same to the lemons and stirred them around.  These would not only add flavor to the eventual gravy, but would also lift the chicken up above the juices.

I set the marinated chickens (again, what a mess) onto the onions and lemons.  As an afterthought, it might be cool to stuff an additional cut lemon and onion into the body cavity of each chicken.  Had I thought of it, and had it not been so messy, I might have.  At any rate, I tucked the chickens in snugly next to each other and took the Dutch oven out to the coals.

Phase one of the cooking is just basic roasting.  I let it roast for about an hour, or until the chickens came up to about 160°F internal temperature.  Almost done, but not quite.  I replenished the coals a couple of times, as it was quite a breezy day.

Then, in phase two of the cooking, I did the dry roasting.  I opened up the lid, and first extracted the juices on the bottom with a poultry baster.  The juices, I put into my 8” Dutch oven.

I set my Dutch oven up to do dry roasting.  This is basically having something that raises the lid a bit so that the moisture can escape.  I have a circular grill grid that’s just a little larger than 12” and it fits very nicely over my Dutch ovens. There are other things you can use, like nails bent into the shape of a “U” and hooked over the rim of the oven.  Whatever raises the lid a little bit.

Since the moisture is no longer trapped, the heat isn’t trapped, either, so you need to use a lot more coals.  So, once the lid is back on and sitting on the lifters, pack the coals on it!

I like to cook chicken and turkey to about 175°F or 180°F.  While that was cooking, I put some coals under my 8” Dutch oven and started simmering the juices.  I added the coconut milk, and let that simmer and reduce some.  In the end I added some starch whisked in water to thicken it up as well.

When it was all done, I had also made some rice and heated up some green beans for the full meal. I carved it up and served it.  It still was quite moist, not as dry as I thought it would be.  It truly wasn’t an authentic tandoori chicken, as I said, but it was delicious!


Mark has discovered a love of Dutch Oven Cooking. Mark also has other sites and blogs, including MarkHansenMusic.com and his MoBoy blog.

Saturday, June 22, 2013

Dutch Oven Boneless Buffalo Chicken

Check out my Dutch oven cookbooks!
This one is the last installment in my series on breaded chicken strips and sauces. It's been a lot of fun thinking of new configurations for an old standby.

I’m a big fan of hot sauce, and I’ve always wanted to be able to make it from scratch.  I had done some studying a long time ago, and I read about having to store it and let it ferment for months and months.  That wasn’t going to happen.  Most of the other recipes for wing sauce I found were all based on Frank’s.

Finally, I morphed a bunch of ones that I saw into this one.  It was a great sauce.  The amounts are estimates.  Really, I just added these things and kept tasting to get it to the point where I liked it.  The core ingredients were the butter, the tomato sauce, the heat, and the vinegar.

Dutch Oven Buffalo Chicken

12” Dutch oven

20+ coals below for frying

10 coals below for baking
30+ coals above


8” Dutch oven

12+ coals below


The Sauce

1/2 stick (4 Tbsp) butter
1/2 onion, minced
2-3 cloves garlic, minced


1 stick (8 Tbsp) butter
2 8 oz cans tomato sauce
~1 Tbsp cayenne
~2-3 Tbsp vinegar, to taste

1 4 oz can mild green chilis, minced
Salt
Pepper
Chili powder or more cayenne to taste

The Chicken:

2 lbs boneless & skinless chicken breast tenders
1/4 cup all purpose flour
1 tsp black pepper
1 tsp kosher salt
1 tsp paprika

The procedure for this dish was similar to the other two (the sesame cashew chicken Dutch oven recipe and the chocolate chicken Dutch oven recipe ), in some ways, and in one big way, different.  I still fried dredged chicken breast pieces, then made a sauce.  Finally I coated them with sauce and baked that on, serving it all up with just a little more sauce and side dishes.

In this case, however, since I wanted to give the sauce plenty of time to simmer, I started with it.

I lit up some coals, and once they got white, put 10-12 of them under my 8” Dutch oven.  I put in the butter to melt.  Then I diced and finely minced the onion and the garlic.  By that time the Dutch oven was hot, and the butter melted.  I tossed in the onion bits and garlic, with a little salt, and let them sweat.

Once those were translucent, I added in the additional butter, let it melt, and then added the tomato sauce, the cayenne, and the vinegar.  These four ingredients (well, and salt) are really the core of the whole dish.  I let it simmer a while, then started tasting it.  I added a little more of the cayenne or the vinegar to balance the overall flavor.

Finally, I minced and added the green chilis, and the salt and pepper, and just let it simmer. I used a whisk to briskly stir it up and break up the chunks as much as possible.

In between simmerings and tastings, I was also preparing the chicken.  This was done just like the other dishes.  I first got about 20-24 lit coals under a 12” Dutch oven, with about 2 Tablespoons of olive oil in the bottom.

I mixed up the flour and spices.  I sliced the well-thawed chicken breasts (skinless, boneless) into 3-4 short strips each, and dredged each chicken piece well in the flour mix.  Then, I began frying those pieces in the heated 12” Dutch oven.  I had to do it in several batches, because I had more chicken pieces than I could fit into the bottom of the Dutch oven.  I cooked each piece about 10 minutes a side.  I had to pay close attention to the heat under both Dutch ovens, so that the chicken would brown nicely, and the sauce would keep up an easy simmer.

When all of the chicken was done, I put it all in the 12” Dutch oven and drizzled about half the sauce on top. I stirred all that great chicken and sauce up, so I could see that each piece was well coated, but not soaked.  I put about 10 coals under that Dutch oven, and put a 12” circular grill on top of it.  Then I put on the lid with upwards of 30 coals on it.  The grill makes a space under the lid, so that moisture can escape.  The extra coals on top are needed to make up for the heat that escapes as well.  This creates a dry-baking environment, and the sauce cooks on to the chicken in sort of a glaze. There are lots of things you can do to create the gap in the lid.  The grill is just one convenient way for me.

I didn’t need to bake it long, because everything is actually cooked at that point.  I used that extra time to steam a few corn cobs in another 12” dutch oven as a side dish.

When I served it up, I included some celery strips, and some blue cheese or ranch dressing as an additional sauce to balance out the heat of the sauce. I was very pleased with the results.  It was delicious!  Unfortunately, the acidic sauce also ate the patina off patches of the bottom of my 8” Dutch oven, so now I have to reseason it!

It was worth it!

Here are more great Dutch Oven Chicken recipes!


Mark has discovered a love of Dutch Oven Cooking. Mark also has other sites and blogs, including MarkHansenMusic.com and his MoBoy blog.

Monday, June 3, 2013

Dutch Oven Cashew Sesame Chicken

Lately, I’ve been doing these chicken dishes where you dredge some chicken breast strips in flour and spices, and then fry them.  Then you make some kind of sauce, and bake the sauce on like a glaze.

I think I’ll make it a series, here.  I didn’t really intend to do it, but it kinda worked out that way.   This one is a sort of asian-inspired one, with cashews, ginger, soy sauce, and sesame, and the next weekend was the chocolate barbecue sauce.  I think the next one I’m going to do will be a buffalo sauce.

Ah luvs me mah hotwings!

Dutch Oven Cashew Sesame Chicken

12” Dutch oven

20+ coals below for frying

10 coals below for baking
22 coals above


8” Dutch oven

12+ coals below


2 lbs boneless & skinless chicken breast tenders
1/4 cup all purpose flour
1 tsp black pepper
1 tsp kosher salt

3 garlic cloves, minced
4 tbsps rice wine vinegar
2 tbsp brown sugar
1 tbsp canola oil
1 tsp grated fresh ginger
1/2 cup soy sauce
1/4 tsp red pepper flakes
4 tbsps ketchup

1/2 cup cashews
2-3 Tbsp toasted sesame seeds

1 1/2 cups rice
3 cups water

First, you’ll want to make sure that the chicken is all completely thawed.  Then, light up a bunch of coals.  When they start to get white, put a lot (about 20+) coals under a 12” Dutch oven.  Drizzle some olive oil (maybe a couple of tablespoons), and let that heat up.

Meanwhile, mix the flour, salt and pepper in a small bowl.  If you’re using chicken tenders, they’re already the right size and shape, pretty much.  If you’re using breasts, cut them into strips about an inch wide.  I Dredged the chicken pieces in the flour mixture and put them into the heated, oiled dutch oven.  I kind of snuggled the pieces in pretty close together.  I Let them fry for ten minutes or so on each side, until the chicken was cooked in the middle, and had a nice, crusty brown on each surface.

I had to do all the chicken in two batches, because I couldn't get them all in one Dutch oven.

While the second batch was frying, I came inside and mixed all of the other ingredients into a bowl.  You can adjust the amounts of everything by taste.
When the second batch of chicken was done, I added the first batch back in, and stirred in the sauce, making sure to coat all of the pieces well.  I put it on, and under, the coals to bake a little longer.  I added the cashews and the sesame seeds and stirred those in.  At this point, everything is cooked, but you just want it to be heated, and to have the flavors baked together.

While this was baking, I put the rice and water into the 8” and put that on some coals, with the lid on.  When I noticed steam venting, I let it cook for a bit longer, then pulled it off the coals, and let it sit for another 10 to 15 minutes to finish steaming.

When it was all done, we served the chicken on the rice, and it was delicious!


Mark has discovered a love of Dutch Oven Cooking. Mark also has other sites and blogs, including MarkHansenMusic.com and his MoBoy blog.

Sunday, April 7, 2013

Dutch Oven Roasted Cornish Hens on Broccoli Rice


I was listening to the radio a while back, and I heard a yummy idea.  I don’t think the people on the radio intended it to be so, however.  It was a political show, and they were interviewing a restaurant owner in some middle eastern country.  The interview was all about how the economy was struggling in the wake of the uprisings in that country, bla, bla, bla, yadda, yadda...


But they had the interview after a meal of roasted dove, which they were eating, as was tradition, with their fingers.

I just latched onto that idea, and it sounded delicious, and like so much fun.  I wanted to do something like it. I pondered it for days.  I came up with lots of idea of different ways to approach it, and to make it a full meal, not just a meat dish.

One problem to overcome was the meat.  What kind of bird to use?  I didn’t know where I could get dove.  Quail?  That was a possibility.  One of the guys in the World Championship did a great job cooking quail.  Then, one day shopping, I found some cornish hens, frozen.  Perfect!  Easy to work with, inexpensive, tasty...  And, I think, visually impressive!

This ended up being a very simple dish to prepare. Also, for the record, I was not trying to duplicate any particular middle-eastern cuisine, or any actual traditional dish.  So, there is no effort whatsoever to make this “authentic”.  I just made it all up.  So there.


Dutch Oven Roasted Cornish Hens

12” Deep Dutch oven

10 coals below
12-14 coals above

1 cornish hen for each serving (I did 6, and had one extra)
1 1/2-2 cups salt
1/2 cup molasses
about a gallon of water

3 medium onions
salt
pepper
paprika
chili powder


Two days before the meal, I set the little birds (encased in plastic) into the fridge to thaw.  Since they’re so small, this could probably work in one day, maybe even in the brining process.  But I did it over a couple of days.

The morning of the meal, I got down one of my medium stock pots and put in about a quart or so of hot tap water.  I put in the salt and the molasses.  The hot water helped those to dissolve.  Then, I added about another quart or so of cold water.  I opened up the hen packages and drained them briefly, then poked holes in the skin with a knife.  A fork works, too.  I put them in the brined water.  I topped off the water just enough to cover the hens, then added some ice on top.  The ice and the salt should keep the germs at bay while the meat gets all savory and tender.  I set that aside until cooking time, later that afternoon.

When that time came, I dumped the brine and set the chickens on cooling racks in the sink to drain pretty well.  The meat itself will retain a lot of moisture anyway, and I want to minimize the broth at the bottom of the pot.

While the hens were draining, I cut the onions into chunks.  I cut them in half first, then quartered the halves.  I scattered these into the bottom of the 12” deep Dutch oven, to hold the hens up above the level of the broth that would cook out.

Then I patted the hens dry with paper towels and coated them on both sides with liberal shakes of salt, pepper, paprika, and gentle shakes of chili powder.  I tucked them into to Dutch oven all cozy and got them on the coals.

It’s a longer, lower-temperature roast.  I’m guessing the interior oven temperature is probably around 275 or 300 with those coals numbered above.  The cook time was about an hour and a half to two hours.  I went for an internal meat temperature of 180° as a target.


Broccoli Rice

8” Dutch oven

10-12 coals below

1 1/2 cups rice
3 cups water
Juice of 1 lemon
salt
pepper
1 large broccoli head
Broth and onions from the cornish hens


When the roasting was almost done, I made the rice.  It’s pretty simple, too.  I just put the rice, water, and lemon juice in the 8” Dutch oven, and put it on the coals, with the lid on.  While that was coming up to a boil, I cut the broccoli head into tiny florets.  I noted when the steam started venting out from under the lid.  After ten minutes or so, tossed in the broccoli to steam.  I was really quick with the lid, because I didn’t want to lose much heat or steam.  Maybe five minutes later, I pulled the oven off the coals, with the lid still on, to finish cooking.


Tortillas

12” Dutch oven lid
18-20 coals below

Flour tortillas (prepackaged or make your own)

My original idea was to make some tortillas from scratch, and then when we eat, we would pull the meat off with our fingers, put it in a torn tortilla piece along with the rice and eat it all with our fingers.  In the end, I was kinda tired and so I got lazy and just used some store-bought tortillas.  But even those have to be prepared.

So, I turned a 12” Dutch oven lid over onto a lid stand over a whole lotta coals (see above), and let it get really hot.  Then I just tossed the tortilla on it and let it heat up and singe a bit.  As each one was done, I put it on a plate covered with a tea towel. Hot tortillas are more flexible and tastier.

When it was all done, it was time for serving.   I pulled the hens out of the dutch oven, and spooned onions and broth into the rice, stirring it all up.  I put a big spoonful of rice mix on the plate, topped it with the hen, and set out the now-warm tortillas.   We ate them just as I had planned, by tearing apart the meat and eating it with the rice in the tortillas.  I also set out sour cream, and salsa, but we didn’t really add them.  It didn’t need it much.

It was a lot of fun, both to cook and to eat!


Mark has discovered a love of Dutch Oven Cooking. Mark also has other sites and blogs, including MarkHansenMusic.com and his MoBoy blog.

Monday, January 28, 2013

Dutch Oven Broth Bread

This bread started out as a query, as me wondering, “What if...?”  I had been planning and baking for my breads party/photoshoot for several days, and my mind was locked in bread mode.  I was thinking, living, breathing nothing but breads.

I wondered, “What would happen if I used some chicken broth instead of water in a bread?”  I started to ponder that thought for a while, then I went to that font of all knowledge and wisdom, the Internet.  Sadly, what I had originally believed was a fresh and unique idea was, in fact, pretty common.  I found a number of descriptions and recipes.

In the end, I went back through my own recipes and decided just to try to substitute it part for part.  But then, I thought about it, and realized that there would be salt in the broth, and some oil as well, so I lessened or eliminated those ingredients.   I wasn’t sure if the broth would be too heavy or too damp.  But I thought I’d give it a try!

I wasn’t sure what to call it.  I thought about “Chicken Bread”, but that sounded too corny.  My wife came to my rescue, and dubbed it “Broth Bread”!  Here it is:

Dutch Oven Broth Bread


12” Dutch Ovens
12-14 coals below
18-22 coals above


2 Cups poultry broth (110 degrees)
1 1/2 Tbsp sugar
1 Tbsp Yeast
1 tsp salt
4-5 Cups fresh bread flour

The broth was from our Christmas turkey, and was frozen in 2-cup baggies.  I put one in a measuring cup and turned on the tap, running hot water over it.  It took a while to melt, and then to come up to a nice warm 110° or so.  I wasn’t in a hurry.  Microwaving it might have gotten it there sooner, but...

Once it was ready, I mixed in the sugar and the yeast.  I set that aside for another ten minutes or so, and let it foam up.  I was a bit concerned about any salt in the broth reacting with the yeast, but it turned out OK.

Then I sifted in the flour and added the table salt.  Remember that I usually start with a little less flour. I stirred it all up, then dumped it out onto the liberally floured countertop.  From here on out, I treated it pretty much like any other bread.  I kneaded until it developed a good gluten windowpane, then stretched the surface into a tight ball, and set it aside to rise.

It rose for an hour or two, getting doubled, and then I lit up some coals.  While those were turning white, I kneaded just a little more (two or three pushes, at the most) and restretched and reshaped it into a boule (ball) again.  I put this into the proofing basket.

Soon, the coals were all lit, and so I oiled the inside of the dutch oven, and set it out on the proper amount of coals, both below and above.  I let that preheat for an additional 15 minutes, then I brought out the bread.  I tipped it into the Dutch oven, then sliced the top.  Unfortunately, my knife wasn’t very sharp (always use razor blades) so it ended up tearing more than slashing.  Quickly, I put the lid on and marked the time.

After 15-20 minutes, I knocked the ash off the coals, rotated the Dutch oven and the lid, and lifted the lid to check on the progress, and to insert the thermometer.

After another 10-15 minutes, I checked, and it was past 200°, ready to come in.  After cooling on a rack, I was able to cut into it and taste it.  I was pleasantly surprised.  The chicken flavor was there,  but not prominent.  Very subtle.  It tasted great as a sandwich bread, and then, later, at the bread party, in the cheese fondue dip!


Mark has discovered a love of Dutch Oven Cooking. Mark also has other sites and blogs, including MarkHansenMusic.com and his MoBoy blog.

Wednesday, December 19, 2012

Sort-of Salvadorean Turkey in the Dutch Oven


I was looking for a different, unique way to do a turkey this last Thanksgiving.  I’d done a lot of variations in the past, and some of them I’d done over and over.  I just wanted to try something new.

I have a really good friend across the street who introduced me to his family tradition, the Salvadorean Turkey. I was really intrigued, so I also looked out on the web.  It turns out that there are lots of different ways of doing it, but they all have some consistent similarities, too.  They all involve some kind of mustard sauce, and some kind of tomato sauce.  Many of them are like a braise in the overall mixed sauce, others make the mustard in a baste, then have the tomato in a braise.  A version I was kind of attracted to had the mustard sauce basted and browned on the skin, and the tomatoes and fresh chopped veggies around the bird.  After the turkey is done, the veggies are pureed and served in lieu of gravy.

That was the version I did!

A note on authenticity:  Whenever there’s a dish that’s this traditional with this many variations, you’re sure to upset someone when you do it.  I don’t know that what I ended up doing is a “Real Salvadorean Turkey”, and someone’s Salvadorean grandmother will surely be upset by it.  Oh, well.  It tasted GREAT, and I thank the Salvadoreans for their recipes, or at least their inspiration!

Another note: Apparently, a large part of the tradition is making sandwiches using the leftover turkey and sauce in the days that follow the celebration.  Sounds like a great plan to me!


Dutch Oven Salvadorean Turkey Dinner

14” Deep Dutch oven
16 coals below
16 coals above

1 12-14 lb Turkey hen, thawed

Brine
1 lb brown sugar
1 lb table salt
Water

Baste
1/2 cup mustard
1/4 cup worcestershire sauce
1/4 cup honey
a bit of thickener, like guar gum, or just flour

Veggies
3-4 large Potatoes
6-8 Roma Tomatoes
1-2 Green Peppers
2-3 stalks of celery
1-2 Medium Onions
4-5 cloves Garlic, sliced
1 cup coarsely chopped Green olives

Sauce
Roasted Pumpkin seeds or unflavored sunflower seeds in the husk
liberal shakes of parsley, basil, oregano
A little chili powder
Salt and Pepper


The dish begins the day before the cooking.  The turkey had already been thawing for a day or two in the refrigerator.  That allowed it to thaw some, but there was still a lot of ice inside.

I prepared a brine bath by cleaning out a large drink cooler.  A flat food cooler that you take camping will also work, as long as it’s watertight.  I scrubbed it out with dish soap and rinsed it in hot, hot water.  Then I put about a half gallon of hot water in the bottom and mixed in the salt and sugar.  That’s a lot of each one, I know.  When that was mostly dissolved, I added enough cool water to bring it up to about half way full.  I opened up the turkey package, and let it drain a bit, and then use a fork or knife to poke some holes in the skin all around.  Then I put the whole bird into the brine bath.  I added more water until the turkey was covered.  I closed up the lid, nice and tight.

Now, usually, I’m doing this at Thanksgiving or Christmas, so it’s going to be really cool out in the garage.  The bird is also usually still thawing, so it’s going to keep the water really cool, too.  So, between the cool and salt, I don’t worry too much about germs.  Sometimes, however, just to be sure, I’ll add some ice on top.  It won’t really impact the thawing, but it will help keep it cold enough to retard the germ growth, and keep it out of the danger zone (above 40 degrees fahrenheit).

The next day, cooking day, Thanksgiving Day, I got my 14” dutch oven ready.  I don’t use it as often, so I gave it a good wiping, and then coated it with a quick spray of oil.  Not much.  I lit up some coals and let them start to get white.  I pulled the turkey out of the drink cooler, drained off the brine, and put it into the dutch oven, breast up. I got out some paper towels and patted the skin surface dry.  There’s still a lot of moisture in the meat, and that will end up in the braising sauces.

Once the coals were getting hot, I put the Dutch oven onto the coals, as written above, letting it start to roast.  I also inserted a meat thermometer.  Also, make sure that you have extra coals burning in a stack or in your chimney, so that you can start fresh ones.  This will be a long, slow cook.

I mixed up the baste ingredients.  It’s pretty simple, and you can adjust it to your taste.  I wanted it to be a thick glaze, almost a paste.  Once it was mixed, I opened up the Dutch oven and slathered it over all of the top and side surfaces of the turkey.  I only used about a third of the mix at the time.  The rest I reserved for future bastes.

Then, I let it cook for about an hour.  I kept refreshing the coals, trying to keep it at a steady medium to medium-low heat.

After about an hour and a half (almost half-way through the total cook time), I started preparing the veggies, dicing and chopping as needed.  The potatoes, I skinned and cubed.  These went in first, around the base of the turkey.  The other vegetables got scattered around the sides.  More baste went on top of the turkey.

During the last half of the cooking, I rebasted the turkey about every half hour to 45 minutes.  It started to form a really great crust.  In the last half hour or so, I put my 8” Dutch oven on about 10-12 coals, and tossed in the pumpkin or sunflower seeds, with a little olive oil).  I put the lid on, and let them roast for 15-20 minutes, stirring occasionally.  I like to get them quite brown, even a bit black, to get some smoky flavor!

When the turkey is done (at least 170 degrees, preferably 180), there is still much to do!

I brought the Dutch oven in from the coals, and using meat forks, lifted it out onto a plate.  I tented it with aluminum foil so as to preserve the heat and let it rest before carving and serving.

The next part is a bit tricky.  I scooped out the veggies and potatoes with a slotted spoon, letting them drain as I lifted them out.  I separated the potatoes from the veggies as best I could.  If there are some bits of veggie mixed in with the potatoes, and vice versa, that’s fine.  The potatoes I put into a collander to drain.

The veggies went into a blender with the herbs and other seasonings.  I tossed in some of the roasted seeds, just a few to start, and gave it a spin.  As I was pureeing the veggies into a sauce, I adjusted the thickness by adding more roasted seeds.  If you’re careful, it’s pretty easy to do.  If you go too far with the thickness, you can add more turkey juice from the bottom of the dutch oven.  Come to think of it, a little milk or half-and-half would really make it taste rich.  But that might cool it too much...

The potatoes then went into a bowl for mashing.  I added some salt and pepper to pick it up a bit. Again, if they’re too dry, you can add some of the turkey juice to make it a bit more fluid.

Finally, I carved the turkey and served it up!  The idea is that the diner will have a slice of turkey, with some potatoes on the side, with the tomato and veggie sauce drizzled over it.  It’s a delicious and flavorful combination, and since the bird, the potatoes and the veggies were all cooked together, there is a nice consistent sharing of flavors between all three!


Mark has discovered a love of Dutch Oven Cooking. Mark also has other sites and blogs, including MarkHansenMusic.com and his MoBoy blog.

Tuesday, January 17, 2012

...It tastes like... Victory! Part 1


This last Sunday, I conquered two of my own culinary hurdles.  These two things had given me all kinds of trouble in the past, ending in one problem or another, always with something that didn’t quite taste or look right.

The sad thing is that they’re both pretty easy.  So, why did it take me so long to get them right?  Who knows.  Maybe it was my own pride. Whatever the reason, I feel more confident today for having come through the battle victoriously!

The two problems?  Turkey gravy and a peach cobbler.

I know, right?  These are like the simplest things ever!  My gravy would turn out lumpy or runny.  My cobblers would be dry and powdery or gloopy mush.  It was tough to make them just the way I wanted them.

So, these next few posts are all about this victory!

Bacon-Draped Turkey with Gravy

14” deep Dutch oven

14-16 coals below, same above

The Brine

  • 1 10-12 lb turkey hen
  • ~2 cups brown sugar
  • ~2 cups kosher salt
The Turkey
  • Salt
  • Pepper
  • Paprika
  • ½ cup honey
  • 1lb package of slice bacon
  • 3-5 medium to large potatoes
The Gravy

8" Dutch Oven

~10 coals below
  • Some of the Turkey Broth
  • ~2 tbsp flour
  • enough water to make it runny when mixed


I had planned on cooking the Turkey on Sunday, so on Friday night I took it out of the freezer and put it in the fridge.  That gave it a little bit of thawing time before the brining, the next day.

On Saturday night, I got down our big orange drink cooler (the perfect size and shape for a turkey) and washed it out very thoroughly.  I dumped in the sugar and the salt.  I put in about four inches of water and stirred it all up until everything was pretty much dissolved.  Then I opened up the turkey package and put it in the cooler.  I filled it up with enough water to pretty much cover the turkey (it floats a bit), and had it been summer, I would have put some ice in the cooler, too.  Since it was winter, I just put the whole thing out in my garage, where temperatures were forecast to be in the low 30’s.

After church on Sunday, I lit up some coals.  I got out the turkey and put it in the bottom of the 14” deep Dutch oven.  My initial intent was to put a layer of potatoes under it so that it would be up above the liquid drippings, but the turkey was too big to allow that.  So, the potatoes came out and the turkey went in, right on the bottom.  I rubbed on some salt, pepper, and paprika.  Over that, I drizzled half of the honey.

Then, I opened up the package of bacon and started laying the strips in a sort of weave pattern across the top of the turkey.  When it was all spread over, I poured the rest of the honey on top and let it seep in between the bacon strips.

This went out on the coals for a good 3 + hours.  While that was cooking I cubed up the potatoes into 1” chunks.  These went in the pot around the turkey.

I maintained the coals in the side fire to keep the Dutch oven hot.  I suspect that the turkey wasn’t totally thawed when I put it in, so I let it cook to past 180 degrees.  By the time the turkey was done to that point, the bacon was pretty much crispy, too.  I had worried that it wouldn’t be, because of the moisture in the dutch oven, but it crisped up great!  In the future, I would have some extra honey on hand to pour on toward the end of the cooking as well.

As the end approached, I got out my basting syringe and sucked up a lot of the juices from the bottom of the Dutch oven.  This, I put into my 8” Dutch oven, and put on some more coals.  I put the lid on, but kept only bottom heat.  My intent was to get it simmering.

With the lid on, it didn’t take long to simmer.  I mixed about 2 Tablespoons of flour with a bit of water, enough to blend them together, but to keep it very runny.  I poured some of the flour mixture into the simmering broth, and whisked for a few minutes.  I watched the thickness carefully.  Sometimes, I’ve added too much flour and it has cooked into a gel.  I kept adding and stirring, adding and sirring, waiting several minutes in between each pour, to watch for results.  Before long, it was the right consistency.  Thick, but still fluid, and not clumpy.  I didn’t add any seasonings, as I felt that the turkey broth itself already carried much of that.

When my guests had arrived, and the turkey was done, I brought it in and let it settle for a few minutes.  It was tricky to carve, because the bacon was crispy, and it crumbled.  Next time I do this, I’ll pull the bacon off first, carve the meat onto a serving plate, then crumble the bacon bits onto the turkey pieces.

I served the potatoes as is on the side.  It would have been very easy to make them into a mashed potato dish, too, but I didn’t this time.

In the end, it was yummy.  I’m not sure that it was the best turkey I’ve ever done, but I still liked it.  The victory of the gravy poured over the meat and the potatoes was particularly delicious, though!


share

Mark has discovered a love of Dutch Oven Cooking. Mark also has other sites and blogs, including MarkHansenMusic.com and his MoBoy blog.

Tuesday, August 17, 2010

Dutch Oven Braised Chicken

I found this one in a cookbook of mine, and I really liked the appeal of it.  It looked a little bit fancier than just roasting up a bird, so I thought I’d give it a try.  As always, I tweaked up the recipe a little bit, based on my experience long ago of making tomato soup from scratch. 

This one’s a two-step process.  You first cook the bird and the veggies in the dutch oven with the liquid, and let the tomatoes dissolve.

Then, you carve the bird and puree the liquid with a little thickener to make the sauce.  Serve it up, together.

And, then, the next day, I had enough leftover chicken bits and sauce to make a delicious thick soup.  It really was a versatile meal.

Dutch Oven Braised Chicken

12” deep dutch oven
10-12 coals below
12-14 coals above

Serves 8, 475 Calories per serving

  • 1 whole chicken
  • Salt
  • cayenne
  • Black Pepper

  • 4-5 stalks celery, chopped
  • 4-5 large tomatoes, diced
  • 2 bell peppers, diced
  • 1-2 onions, diced
  • 4-5 cloves garlic, coarsely minced, or sliced

  • 1/4 cup lemon juice
  • 2 cups chicken stock
  • liberal shakes of parsley
  • liberal shakes of cilantro

  • 2-3 tablespoons flour

So, I started off with the chicken, thawed completely, of course.  I’ve had problems with cooking chickens and turkeys that were still frozen.  I coated it with kosher salt, coarse ground black pepper, and some pretty liberal sprinkles of ground cayenne.  Next time, I’ll probably lighten up on the cayenne.  I don’t mind hot, but in this case, it started to overpower the other flavors.  I rubbed all that onto the chicken, and set it in the deep dutch oven to allow the seasonings to absorb a bit.

While that was happening, I lit up some coals and started chopping the veggies.  These were all just scattered all around the chicken.  Then, I added the juice, the stock, and the herbs sprinkled on top.

I had a really, really tough time getting coals lit.  My wife had bought a bargain brand, and they would NOT light and turn white, no matter what I tried.  I did finally get them going, but it took me about an hour to get enough to get started.  Lesson learned:  Stick with brands you know.  My favorite is Kingsford...

The rest of the cooking process was pretty simple.  Just keep hot coals on it, until the internal temperature reaches 165.  There wasn’t much else to that.  The liquid simmered the veggies down and seasoned the meat, and it was all great.  I tasted it a time or two, but I felt it was all pretty balanced, except maybe too much heat, as I mentioned before.

Once the meat was done, I brought it in, and pulled the chicken out of the dutch oven.  That’s not always easy for me, because I like to serve straight out of the dutch.  It’s like it connects in my mind that this delicious meal came out of the dutch oven instead of my stove, and I feel like I’ve accomplished a greater challenge. 

Or something like that.

Anyway, I tented the chicken with some aluminum foil to rest, and I scooped up some of the veggies with a slotted spoon.  These, I reserved as a garnish.  Then, I ladled out most of the remaining liquid into my blender.  Yes, I used an electric appliance.  Sue me.  I added just a bit of flour as thickener and pulsed it up, then pureed it.

I carved up the chicken and put it onto a serving tray, then as a final touch, poured the puree on top and added the veggie bits on the side.  It looked really, really good, and tasted very gourmet as well.  I was quite pleased with myself!  Smug, even...


share


Mark has discovered a love of Dutch Oven Cooking. Mark also has other sites and blogs, including MarkHansenMusic.com and his MoBoy blog.

Mark's Other Blog Posts: Long Long Time 

Friday, August 6, 2010

Buying a Dutch Oven to Cook a Turkey

Warning:  Shameless Affiliate Promotion Ahead

I just got an email from someone asking about buying a dutch oven to cook a turkey.  There are a lot of options, and which you’ll end up using depends a lot on what you want to do, especially how big a turkey you want to cook.

My first thought is to get a deep 14” dutch oven.  It’s surprising, but that can actually cook a pretty big bird, if that’s what you want to do.  I have two 14” deep dutch ovens, from some minor name brand.  My preference is to cook turkey hens in them (which are usually around 10-14 lbs).  That gives you plenty of room around the bird for air circulation and some veggies, like potatoes, celery, carrots, onions, etc...

I have, however, also used them at times to cook bigger birds, even up to 22 lbs.  Once, when cooking a big one, I had to give it CPR to get the lid to close, but it works.

The Amazon link, here, is a spot where you can buy one, and yes, if you do, I’ll make a commission.  The picture in the link is a generic dutch oven, and doesn't really show the size of the 14".  I hope that all comes across as legal disclosure instead of begging.  But then, again, I’m not above a little begging.

There are some additional options for cooking large turkeys.  One is the Maca oval dutch ovens. This link is not an affiliate, link, BTW.  These are really nice and huge.  They are heavy.  I’ve used one before, because I was cooking for all of my wife’s family at Christmas.  I had to borrow it, and I’m really glad I did.  It worked really well, and I’m grateful to the trusting soul that loaned it to me.  It will cook a really, really large turkey.

Another option is the Camp Chef Ultimate Turkey Roaster.  This is also not an affiliate link.  This is kind of an oddity in the dutch oven world.  It turns the turkey on it’s end, rather than resting on its back, as usual.  It’s like having two big pots, and you’re stacking one on top of the other.  I’ve never used one, but I’ve seen people do it, and I’ve seen them cook 20+ lb turkeys in it.

So, all three options work with large turkeys, although the Maca and the Camp Chef UDO would probably work better.

After all of my experiences cooking turkey, I think the way I’ll do it from now on, honestly is to stick to smaller birds in my 14”.  I think the smaller turkeys are juicier and tastier.  Alton Brown, of the show “Good Eats” on Food Network agrees with me. That is also not an affiliate link.  He says that the bigger turkeys are raised in small cages, pumped with hormones or other chemicals, and can barely stand to support their own weight. 

If I’m cooking for a crowd, like my in-laws, I can do two 14 lbers, cook them with different, unique seasonings and flavors, and actually have more meat than one 22 lber with one flavor.  Or, I can do one turkey and one ham.  With two 14” dutch ovens, I have more flexibility and better meat.  Win-win!

So, once again, we have a $75 answer to a $10 question.  By the way, here’s a link to my best turkey in a dutch oven recipes


share


Mark has discovered a love of Dutch Oven Cooking. Mark also has other sites and blogs, including MarkHansenMusic.com and his MoBoy blog.

Mark's Other Blog Posts: A Spiritual Epiphany

Monday, June 21, 2010

Father's Day Feast

It was four years ago that my Dutch Oven adventure started.  I even have a hard time remembering the scene, now.  I seem to remember that it was June of 2006, father's day.  We were living in the basement of my in-law's home at the time, waiting the many months for the completion of construction on our home.  My wife bought me a Lodge 12" dutch oven and gave it to me.  I don't remember how I seasoned it, but I got it done and started wondering what I was going to cook in it.

I had pleasant memories of boy scout campouts and making pizza.  So, I decided to try it.  It was simple, and it worked, and I was encouraged by my first bits of success.  My kids, of course, loved it, because it had pepperoni.  I remember, I used one of those boxed pizza crust mixes, and a jar of Prego for the sauce.

From there, I started cooking pretty much every sunday, and with few exceptions that has continued through today.  It was nearly 8 months later that I began blogging my recipes. I don't see any of that changing in the near future, either.  It's been wonderful.  I've met a lot of new friends, and learned a lot of new skills.  It's been a great ride.

So, yesterday, I cooked up a feast.  My wife was surprised.  Why should I want to cook on Father's Day?  See, she looks at cooking like a chore.  I look at it like a break from my crazy week.

I started out thinking I would do a turkey, and do it with that southwestern spicy rub that I really liked.  I thought, however, that this time I'd brine it first.  So, the night before, I cleaned out one of our coolers, opened up the turkey, and put it in.  Then I covered it up with cool water, and mixed in the salt and sugar.  Actually, I mixed the salt and sugar in a separate bowl first, to make sure it dissolved right.  I left that overnight to soak and to thaw.

I thought I would do another no-knead bread, too, so I got the dough ready and set it out to ferment through the day. 

The next afternoon, after church, I got things started.  After lighting up the coals and getting the turkey on to roast, I got the bread ready.  I didn't really do anything fancy.  I just followed the recipes as I wrote them!

I did change up the bread in a couple of ways, however.  Just after I put the dough into the hot dutch oven, I sprinkled the top with parmesan cheese.  Lightly, mind, nothing too oppressive.

Once those were cooking, I was just relaxing and keeping the coals on it.  It was a kind of windy day, so I had to keep on top of the coals and keep adding more to the pile in order to keep heat on.  But it wasn't a stressful cook at all.  The bread took about an hour, and the turkey about three.

The Bread, by the way, turned out phenomenal.  I finally got a soft crust, with big bubble holes in the crumb!  I was so thrilled with myself.

As the turkey was nearing done, I got to thinking about what to serve as a veggie.  I thought about Potatoes, and then I suddenly got this idea to do an oven full of steamed mixed veggies.  I Cut a bunch of veggies of various kinds and colors into bite-size bits.  I used snow peas, broccoli, red and yellow sweet peppers, and cauliflower.  I put them on one of those metal, fold-out steamer things, like I did with the corn a few weeks ago, and put in a few cups of water.  That went out on the coals.

When they were done, about 45 minutes later, I poured some italian dressing over them and sprinkled on some more parmesan cheese.  They were delicious and elegant.

At that point, I knew this was more than just a dinner, but a real treat, so I got out our nice dishes and we all sat down.  Turkey, veggies, and bread.  What a feast!  A great way to celebrate Father's Day, and a special Dutch Ovening Anniversary!


share


Mark has discovered a love of Dutch Oven Cooking. Mark also has other sites and blogs, including MarkHansenMusic.com and his MoBoy blog.

Mark's Other Blog Posts: Comfort and Affliction in LDS Music

Wednesday, March 17, 2010

Herb & Bacon Cornish Hen Halves in the Dutch Oven

This one was pretty cool, and very easy.  A nice, one-pot, one-step meal.  I didn't get any pictures of it.  It just turned out nice.

Usually, when we buy cornish hens, they're whole, but this time we found some that were split in half, down the spine. That made it easy to layer like this.

12" deep dutch oven
12-14 coals below
16-18 coals above

  • 4 medium potatoes, halved and sliced
  • 2 medium onions, sliced

  • ~2 Tbsp olive oil
  • Parsley
  • Basil
  • Oregano
  • 3 cloves garlic, minced
  • Salt
  • Pepper

  • 4 halves of cornish hens (one per person), thawed
  • 4 slices thick cut bacon


I started off by creating the bottom layer (I did all this while the coals were heating up).  I cut the potatoes into large chunks, and the onions into quarters and spread them over the bottom of the dutch oven.  That would serve to elevate the hen halves above the drippings.

Then, I mixed all of the ingredients in the second set.  I played it pretty loose with the amounts.  Just shake some in the bowl and stir.  Taste it and see.  I made it a little runnier than a paste.

Make sure that the hens are thawed.  There were some that weren't, and when we were serving them, a few weren't completely done.  I was embarrassed, and we had to finish them in the microwave.  What a shame for a dutch oven cook.

Anyway, I covered a hen half in the herb baste, draped a piece of bacon over it and set it in the dutch oven.  I had to kind of overlap them a bit to fit them all in.  That went out onto the coals until they read 170 degrees.

See?  Simple.  But delicious.  Even the microwaved ones weren't too bad.

...And afterward, I made stock.  Yum!


share


Mark has discovered a love of Dutch Oven Cooking. Mark also has other sites and blogs, including MarkHansenMusic.com and his MoBoy blog.


LinkWithin

Related Posts with Thumbnails