Sunday, May 21, 2017
Curryish Seafood Soup in a Dutch Oven
So, that’s all a pretty tall order. I looked through the fridge and freezer, and found some proteins (the seafood), a lot of seemingly random veggies in the fridge, and of course, our own pretty well stocked spice cabinet and pantry. I started to get an idea in my head. I would make a tomato-based soup, combining all of the seafood and veggies, and using curry spices. I don’t know that it’s really an “authentic” curry, but it ended up tasting GREAT! Maybe you could call it “Indian Fusion”... Whatever that means.
Mark's Curryish Seafood Soup
12” shallow Dutch oven
20 + coals below to sautee
14-16 coals below to simmer
1 Tbsp olive oil
2 Medium Onions, diced or sliced
3-4 Stalks Celery, diced
4 Cloves Garlic, minced
1/4 Peanuts, shelled, roasted or not
Salt
4 Cups Poultry stock
1 lb Shrimp, peeled, deveined
1-2 lbs of other seafood, like Salmon and/or tilapia filets
1 6oz Can Tomato paste
1 8oz Can Tomato sauce
1 14oz Can Coconut milk
1-2 8oz Cans Water chestnuts, drained
Cauliflower
Curry powder
Chili powder
Lemon juice
Salt
Pepper
Oregano
Parsley
Tomato powder (optional)
Start out by thawing everything. I keep my homemade stock frozen in old drinking water bottles, so I have to let it melt. The seafood was also frozen.
Once those were thawed, I got some coals on. While they were getting hot, I diced the veggies. I put the Dutch oven on the coals listed for the saute, and drizzled in the oil. Once that was nice and hot, I tossed in the veggies, stirring them frequently. The salt helps with the flavor, and it also draws out the moisture. I had read that indian spices are more flavorful if you “activate” them in hot oil for a few minutes first. Next time I do this, I’ll shake in the curry powder as the oil is heating. I’ll see if that makes any difference.
Once the onions are translucent, and the celery is getting a little softer, I added in the the second set of ingredients. I adjusted the coals for the simmering phase. Really, I just let the coals keep burning down, and I don’t replenish them quite as much. If it gets boiling too vigorously, I’ll pull some coals out, or just wait a while before adding any fresh coals.
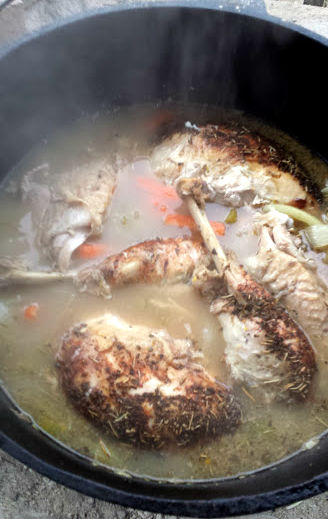
Also, when I start the simmering phase, I keep the lid on. This traps the heat and helps it get up to boiling a little quicker. After it’s simmering, I take the lid off. I stirred it every 15 minutes or so, breaking up the fish filets, and making sure that the bottom isn’t burning.
After about 45 minutes or so, I added in the flavorings in the final set of ingredients. I went pretty liberal with the spices, etc. I added a little of each one, then after 10 minutes or so, tasted it, and added any that I thought were lacking. Go easy on the hot pepper/chili powder at first, because you can always add more heat, but you can’t take it out.
I want to explain the tomato powder! About a year ago, I wanted to make some dried tomatoes, like the ones that get packaged in small jars of olive oil. They’re almost fully dried, but not quite. So, I cut up some tomatoes and put them on bread cooling racks in my oven. I set the oven to the lowest possible setting, propped the door slightly open, and went on about my business. Well, I let it go too long, and the poor tomatoes ended up almost burned. But a moment of inspiration hit me, and I ground them up in my blender, and made it into a powder. It has a delicious, smoky tomato flavor! I like using it a lot, and, in fact, I’m almost out, so I think it’s time to make more!
When the cauliflower is soft, and the flavors are all well-stewed together, you can call it done! Serve it up with some fresh-baked bread!
Mark has discovered a love of Dutch Oven Cooking. Mark also has other sites and blogs, including MarkHansenMusic.com and his MoBoy blog.
Wednesday, May 25, 2016
Dutch Oven Roast/Braise Turkey
A braise is where meat is cooked in a certain amount of simmering liquid. It’s usually done in smaller pieces. In this case, I did the entire turkey, and combined the techniques of roasting and braising.
14” Dutch oven
14-16 coals below
16-20 coals above
1 10-12 lb turkey
Salt
pepper
paprika
garlic powder
oregano
parsley
rosemary
4 cups apple juice (with no additional sweetener)
juice of 2 lemons
4 cups water or stock
zest of the lemons
4-6 potatoes, sliced
4-6 stalks celery, diced
3-6 medium onions, diced or sliced
2-4 sweet peppers, diced
3-5 cloves garlic, minced
I started out with the turkey, thawing it overnight. Usually, I’ll brine a turkey by putting about half to 3\4 of a cylindrical package of salt into a drink cooler, along with a 16 oz pac of brown sugar. I put in a little hot tapwater and dissolve it, then add a lot of cold water, enough to float and cover the turkey. Then I’ll soak that overnight, thawing and seasoning the bird.
I did that this time, but, because of the braising, I’m not sure it’s totally necessary to brine. It does need to be thawed, however.
The next day, after lighting up some coals, I drained the turkey and patted it dry. I also pulled out the neck and giblets. Usually, I save these for stockmaking.
I got out the Dutch oven and put the turkey in, resting it right on the base of the oven. I sprinkled on pretty liberal amounts of the seasonings and herbs listed above, and rubbed them into the skin. I put the lid on and set the Dutch oven to the coals.
Much of the effort in cooking this dish is maintaining the heat. It was cold out, so I spent much of my time indoors. I used a timer set for every 20 minutes to remind myself to refresh the coals on the oven, and replenish the coals in the chimney.
Once the oven was heated up and cooking, I prepared the braise. I started by zesting the lemons, because it’s very hard to zest a squeezed lemon. Then I mixed the apple juice and lemon juice. I mixed gradually, tasting along the way. I wanted a good balance between the acid and sweet. Once I’d found it, I poured it into the Dutch oven and added the water. You could use stock, but I found the cooking turkey turned the liquid into a pretty rich stock anyway.
After about 2 to 2 1\2 hours of braising and roasting, the turkey was at about 150 degrees. I chopped up the veggies in the next set of ingredients, stirred them up, along with the zest, and added them to the Dutch oven on either side of the turkey.
Adding in all those veggies will, of course, throw off the cooktime. After about another hour, the turkey was approaching 160. That’s getting close to done, but I find that I’m more certain of done-ness at about 175 or even 180.
Here’s where the full braising comes in. I took the bird out of the Dutch oven (carefully, to keep it intact) and did a very basic carving. I cut off the legs and the thighs, and separated them. I sliced the breasts off in chunks. I took off the wings, too. I could see, as I was carving, that the meat was juicy, succulent, but not quite fully done.
That was fine, because the final step was to lay the meat back in the Dutch oven on top of the broth and veggies to do a full braise.
At that point, it’s a good idea to start setting the table, because it will probably only need another 30 to 45 minutes to get to full doneness.
Oh, let me tell you, when you serve up the sliced meat in a bowl with the veggies and the flavored broth, it is incredible!
And you can use the bones and remaining meat with the neck and giblets for stock.
Mark has discovered a love of Dutch Oven Cooking. Mark also has other sites and blogs, including MarkHansenMusic.com and his MoBoy blog.
Thursday, December 10, 2015
Dutch Oven Shrimp Bisque
I tasted it, too, and I was really impressed. Naturally, when I’m impressed, I want to try to make it. So, I did some research and found some good recipes. Unfortunately, lobster if quite expensive. I decided to do it with shrimp, which, of course, isn’t cheap, either, but at least it’s not as pricey as lobster.
It has a lot of steps, but it’s very flavorful, because of the shrimp stock you make!
2x 12” Dutch oven
each with 20+ coals below
2-3 lbs shrimp
6-8 cups water
1 14 oz can tomato paste
1 1/2 medium onion
3-4 stalks celery, including leaves
3-4 carrots
fresh parsley
salt
pepper
chili powder
lemon juice
6 cups heavy cream
1/4 cup cornstarch
There are a few ways you could approach this bisque. One way is to use uncooked, unshelled shrimp. Another is to use shrimp that are uncooked, deveined (but still in the shell). A third is to use whole shrimp, complete with the heads. The more stuff that comes with the shrimp, the more flavor you’ll have in your stock. It’s more work, but I’d recommend the whole shrimp. It doesn’t really make a lot of difference how big the shrimp is, either. For this instance, I used uncooked, unshelled shrimp (no heads) that are about the size you normally see in shrimp platters.
I started out with one of my 12" shallow Dutch ovens, covered, with the water. Once the water was boiling, I tossed in the shrimp and watched them turn that sweet pink\orange shade and curl. If you cook the shrimp too long, they get all rubbery. Once they were done, I pulled them out of the water, but left the Dutch oven on the coals.
Then, I doused them in cold water while I peeled the shells, tails, and deveined them. I threw away the veins, of course, but the shells and tails (and heads if you’ve got them) all went back into the stock to boil some more. I set aside the shrimp meat, reserving it for later. Once all the shrimp shells and parts were happily boiling away, I added the tomato paste.
I put the lid on and let that boil for a long time. How long? Well, that kinda depends on how much time you have. The longer it boils, the more flavorful the stock. I let it go for about an hour.
As that time was nearing an end, I got a second dutch oven on some coals, with just a bit of oil in the bottom, and I started dicing up the veggies in the second set of ingredients. I tossed those in the second Dutch oven and cooked them until they were quite soft. Then, I took them off the coals and mashed them with the back of a slotted spoon. It will be a coarse mash, and that’s OK.
Then, I strained out all of the garbage out of the stock, and added the smooshed veggies. Then I added in all of the seasonings in the third set of ingredients. Finally, I added in the cream and let it heat and simmer for about another half hour. As it was simmering, I made a slurry of the cornstarch and water, enough to make it very loose and runny (no clumps). I added that in, about a tablespoon at a time, to thicken the bisque. A hint: give some time in between each dose of starch for it to effect the soup, otherwise, you’ll add too much.
Finally, just before serving, I stirred the shrimp meat back into the soup so that it could come back up to serving temperature, and started ladeling out the bowls! It was delicious! I think it would also be great to serve in a bread bowl...
Mark has discovered a love of Dutch Oven Cooking. Mark also has other sites and blogs, including MarkHansenMusic.com and his MoBoy blog.
Wednesday, March 5, 2014
Dutch Oven Chicken Artichoke Soup
Artichoke is another one of these.
About two weeks ago, I had this germ of an idea for a dish with a chicken soup and a fresh half artichoke. I started looking at various artichoke soups online, and most of them involved canned or bottled pickled artichoke hearts, veggies, and broth, then simmered and pureed. So, what you got was a thicker, creamier sort of soup.
That sounds great, but it wasn’t what I was imagining. In fact, I couldn’t find anyone who had done what I had in mind. That was encouraging, but it also made me nervous.
Dutch Oven Chicken Artichoke Soup
12” Dutch oven
20-24 coals below
1 Tbsp Oil
1 can mushrooms or 1 cup fresh mushrooms, sliced
3 cups cooked chicken, shredded or cubed
2 medium onions, sliced
3 stalks celery, chopped
2 sweet peppers. diced
4-5 cloves garlic, minced
Salt
2 Tbsp Oil
4 tbsp flour
1 cup milk
4 cups chicken stock
Juice and zest of 2 lemons
Parsley
Oregano
Salt
Pepper
3 artichokes
This soup is built up in steps, or layers. First, I browned and sauteed the veggies to get the maximum amount of flavors. I did that in the best order, so that those that cook longer start first. Then, I made a roux to help thicken it, and created the soup. Finally, I added the artichoke halves to cook while the soup simmered.
To get started, I put the 12” Dutch oven on some hot coals, with a little puddle of oil in the bottom. I let that heat up for about 10-15 minutes. While that’s happening I prepared the chicken and the veggies.
A word about the chicken. I had some pulled chicken from when I made some stock a bit ago. After eating a roast chicken or turkey, I boil the remainder (the bones and the rest of the meat), and the liquid becomes stock for soups (see below). I also pull the remaining meat off the bones, and shred it for things like this, or for enchiladas, or sandwiches. For this meal, you could also used canned chicken chunks (well drained and dried), or even cubed fresh chicken. If you use the fresh chicken, you’ll cook it a bit longer in the first step, of course.
When the Dutch oven was hot, I tossed in the chicken and let that sear. I added in the mushrooms, and let them cook down. I really like the mushrooms when they’re quite browned. Finally, I added in the other veggies. All the while, I tossed and stirred everything frequently.
Once the veggies were getting a bit soft and the onions were translucent, I pushed everything aside and made a space in the middle of the Dutch oven. In that, I added more oil, and the flour. Immediately I stirred that into a roux and let it cook, stirring, until it started to smell a bit nutty. It was still quite light, a blonde roux. I mixed everything together.
Then, I stirred in the next set of ingredients, the milk, the stock, the flavorings. As always, you can use the flavors and amounts that you like. I put the lid on, refreshed the coals, and brought it up to a simmer, for about 15 minutes. I tasted and adjusted. Artichoke has some bitter tones, so the acid in the lemon juice goes a long way toward lessening that and livening it up. Make sure you have enough. Vinegar could also be used.
While it was simmering, I prepared the artichokes. I cut them in half, across the stem, so that each half was like a floral bowl. I trimmed off a few of the lower leaves. I got a paring knife and cut and scraped out the “choke” which is the fuzzy stuff in the heart. I also cut out the first couple of layers of innermost leaves, just to make sure that I got everything. Then, I put those into the soup. I pushed them down in, and ladled some soup over them, so that the soup would get down, in between the leaves. I set the timer for 45 minutes, and put the lid back on. During the 45 minutes, I just adjusted the coals, and occasionally checked and stirred.
When it was finally done (a leaf of the artichoke came off freely), I brought it in to cool. I served it up by lifting an artichoke half into a bowl, then ladling the soup around it. I served it with some Pita wedges to dip into the soup. We ate it by pulling off the leaves and scraping the flesh at the bottom of the leaf with our teeth, and then sipping the soup with a spoon. It was delicious!
Mark has discovered a love of Dutch Oven Cooking. Mark also has other sites and blogs, including MarkHansenMusic.com and his MoBoy blog.
Thursday, October 10, 2013
Dutch Oven Cauliflower Soup
Like we often do, we disagreed on one important point. She wanted me to make the recipe just as it was. I guess she wanted to see how close it was to the restaurant dish it was supposed to be mimicking. So, after I made it tame and straight for her, I pulled about a third of it off and mixed in my own flavorings in (including the ham). So, since I’m writing the blog, this recipe is mine, and if you want you can flavor yours however you like.
12” Dutch oven
20-24 Coals below
8 Tbsp (1 stick) butter
2 Med Onion
4-5 cloves minced garlic
Salt
Pepper
1/2 cup flour
2 Cups half-and-half
2 Cups milk
1-2 tsp nutmeg
2 14.5 oz can chicken broth
2 1/2 lbs chopped cauliflower
1 Tbsp mustard
Juice of 1 lemon (with zest, if you like)
1 tsp red pepper flakes
Parsley
2-3 cups cheddar
2 cups cubed ham
1/4-1/2 cup grated Parmesan
1/4 cup fresh chopped chives
I started out by lighting up the coals, and, when they were white, counting them out and putting my Dutch oven over them to heat up. While that was preparing, I minced the garlic, and diced the onions. I melted the butter, and put in the onions and the garlic. I added the salt and pepper, too. When that had gotten translucent, I added the flour and stirred it all up. I let that cook for a while, stirring pretty much constantly, until I could smell that rich nuttiness along with the garlic. Oh, it was great!
Then, I mixed in all the liquids of the second set. I stirred it up and put the lid on. I had to keep replenishing the coals underneath. It’s important to be careful, because if you get too much goin’ on under there, then you can burn the liquid onto the bottom of the pot. Not good. I also stirred it up a lot. Once it got bubbly, I was even more careful with the heat, to maintain a simmer instead of a rolling boil. The main idea in this step is to cook the cauliflower. It takes about 15 minutes, once the bubbles come.
Once the cauliflower is cooked, then it’s time to chop and blend it all up. I could have used our hand blender, but I knew I’d have to have more oopmh. I used our electric immersion blender. I had to angle it so that the chunks of cauliflower could get under the blades. Blend it to your desired consistency. I did it pretty creamy this time. I kinda like some substance, so I think in the future I’d leave some bigger chunks.
After it blends, then start adding in the flavors you’d like. I included the ones I have here because they were easy to grab, and I think they made a really good combination of sour and sweet tones, along with the undertones of the cream. I let those flavoring simmer in for a while, stirring frequently.
In the last few minutes of cooking, I added in the ham and the cheeses. The cheeses melt into the soup, and bond with the flour and the milk and cream. Without the flour, it would be a chunky, clunky, melted mess.
Finally, it was done. I served it up, with the chopped chives as a garnish on top.
Mark has discovered a love of Dutch Oven Cooking. Mark also has other sites and blogs, including MarkHansenMusic.com and his MoBoy blog.
Wednesday, June 15, 2011
Dutch Oven Split Pea Soup in a Bread Bowl, Part II
As I mentioned before, this time, Brendon had the brilliant idea of putting the soup in the bread boules I was making that morning. You could use just about any bread flavor, but this time, the Italian bread was perfect. It’s got a little sweet from the sugar, but not very much. Most of the flavor is from the flour itself, added to the savory tang of the ham and the split pea soup. Amazing!
I used the same soup recipe I always use, which you can find here.
The end result is a delicious, rich, and even elegant meal.
Mark has discovered a love of Dutch Oven Cooking. Mark also has other sites and blogs, including MarkHansenMusic.com and his MoBoy blog.
Tuesday, June 7, 2011
Dutch Oven Split Pea Soup in a Bread Bowl, part I
Originally, when I thought about cooking this weekend, I thought first about doing split pea soup. This was primarily because we had a ham bone left over from a dinner a few months ago, and I always love making soup out of it. I was also itching to make some bread, and a type that I wasn’t used to, either.
So, I busted out my “Bread Baker’s Apprentice” by Peter Reinhart, and started looking it over. I chose to do the Italian bread. Italian bread is an “Indirect” bread, according to Reinhart, meaning that it has a preferment before the main mixing phase. In this case, I chose to do it overnight.
Dutch Oven Italian Bread
The Biga (I don’t know why they call it that)
- 2 ½ Cups unbleached bread flour
- ½ tsp yeast
- ¾ cup to 1 cup water at room temperature.
I mixed the ingredients above in a bowl, then turned them out onto a floured tabletop and kneaded for a few minutes until it all came together. At this stage, I didn’t worry too much about it forming a windowpane. I just wanted it to feel smooth, like a bread dough in and of itself. Then I oiled it, and put it under plastic wrap in a bowl. I put it in the fridge overnight.
If it hadn’t been so late at night when I made the Biga, I actually would have set it out to rise for a couple of hours, and then put it in the fridge.
The next morning, I took it out of the fridge and set it out to come back up to room temperature. At that point, I chopped it up into about 10 pieces. I gathered the ingredients for the main dough mix.
The Main Dough
- 3 ½ cups of Biga (pretty much all of what I mixed the night before)
- 2 ½ cups unbleached bread flour
- 1 ⅔ tsp salt
- 1 Tbsp sugar
- 1 tsp yeast
- 1 Tbsp olive oil
- ¾ cup water at about 100 degress F
I mixed all of the ingredients in a bowl, then dumped it out on the floured counter and began kneading for real. I kneaded for almost 20 minutes, and at that point I got a good windowpane. I set that aside to rise on the countertop.
This time, it rose quite well. After only about two hours, it was ready to shape. Before I degassed it and began working it, however, I got some coals lit. Then I came in and shaped the dough into four equal quarters and made them into boule shapes (balls). I put these in a square configuration on a piece of parchment on a plate.
Soon the coals were hot, and I put an oiled dutch oven on and under a lot of coals, probably a total of about 30, with an oven thermometer inside. After about a half hour, it read 350 degrees. I probably should have let it heat for another ten to fifteen minutes, to about 400 at least, but I didn’t. The dough had proofed up nicely, and I was nervous about them cooking fully before church. I lifted the dough balls up by the parchment paper and lowered them into the dutch oven. I closed the lid and marked the time.
After about fifteen minutes, I rotated the oven and the lid, so that it was positioned differently in relation to the coals (to prevent hot spots on the oven). I also peeked in, and inserted a thermometer into the now cooking bread. It didn’t spring up like I would have liked, and that’s why I think I should have heated up the oven hotter.
After about another 20 minutes, the thermometer read 200, and I knew it was done. I pulled it off the coals, and dropped the bread onto my cooling racks.
It was at this point, that I told my son that I was going to cook the pea soup, and he suggested using the bread as bowls. They were the perfect size, and shape. It was brilliant!
So, next entry, I’ll write up the soup, and show you the bread bowl results.
Mark has discovered a love of Dutch Oven Cooking. Mark also has other sites and blogs, including MarkHansenMusic.com and his MoBoy blog.
Mark's Other Blog Posts: name post, name post,
Monday, May 10, 2010
Dutch Oven Split-pea Soup With Ham
So, even though I'm working in the garden, I still wanted to cook. I wanted something simple and easy, a two-step, one-pot meal. I'd found, buried in the freezer, an old ham bone from one of my past dutch oven roasting days. Time for split-pea soup!
I had done split-peas many times before. This recipe for Dutch Oven Split-Pea soup is the first time, and this one has been the basis for all of them. It's good, but this time I kicked it up a notch. It must've worked, because even though I cooked up a whole 12" dutch oven worth of the stuff, there were no leftovers. That's good, too, because split-pea doesn't usually make great leftovers. It ends up as less of a soup and more of a paste.
I've found, by the way, that when you do these recipes, your final result will vary a little based on the way you cooked your ham. Some of the residual flavors and spices from the ham will carry over into the soup. I, personally, like that. It gives a little variety. The same is true if you make your own chicken stock.
Anyway, since I really dressed up this recipe, I'm going to rewrite it here, rather than just linking back.
Dutch Oven Split-pea Soup with Ham
12" Dutch Oven
15-20 coals below
- 1 sliced onion
- 4-5 cloves of garlic, minced
- 2 stalks chopped celery
- 6 cups water, at least half of which could be chicken stock
- 1 lb bag of dried split peas
- 1 ham bone with lots of meat left on it.
- 1 diced potato
- Generous shakes of oregano, parsley, and chili powder
- salt and coarse ground pepper to taste
I started by lighting up some coals and letting them start to get white. I put about a tbsp of olive oil in the bottom of my dutch oven, and let that heat up. I chopped up the veggies while it was all getting going.
Once the oil was hot, I dropped in the onion, the garlic, and the celery to sautee. Remember, if it's hot enough, they'll sizzle as soon as you drop them in. I stirred them up and salted them a little. The dutch oven was plenty hot, and pretty soon they were browning.
Once the garlic was brown and the onions were translucent, I poured in the liquid. I used a bullion powder to make it all chicken stock. I didn't have any of my homemade stock left. Bummer...
Then I added all of the other set two ingredients, and let it come back up to a boil.
Once it was simmering, I started adding in the herbs and the chili powder. I added the chili powder a bit at a time. I'd shake in some, let it simmer for 15 minutes or so, then taste. Add some more, wait, and taste. I wanted it to have an edge, but I didn't want to have a recognizable chili taste. In the end, I probably added a little under a teaspoonful. Season with salt and pepper to taste, but be a little cautious, because the ham will add lots of salty flavor already.
It turned out great! We all gathered around our new patio table, and had a wonderful outdoor meal. If you try this one, let me know how it goes!
|
Mark has discovered a love of Dutch Oven Cooking. Mark also has other sites and blogs, including MarkHansenMusic.com and his MoBoy blog.
Sunday, January 10, 2010
Mark and Brendon Make Chili in Dutch Ovens!
Remember when I said that cooking is less of a recipe and more of a process? That it's more than just a list of ingredients? True that. And, at the same time, not so much. I will elaborate in a minute. Bear with me.
Last night was our ward (A Mormon church congregation) annual chili cookoff. About fifteen or twenty or so of us all presented our best chilis. There were judges, and many others that just came to have some great food and fun with friends. It's been one of our best attended ward activities, almost as much as the Christmas party.
So, like I said, I made the white chili. I was very meticulous about the process. I stepped through things one bit at a time, and did everything just right. And, honestly, I think it was the best chili I'd ever made.
Brendon, on the other hand, pretty much ignored process. He soaked his beans a while, and he browned the meat before hand, but other than that, he just pretty much added his ingredients as soon as he had them ready. And his chili tasted great, too! In fact, his won a very enviable prize that night: "Best 'what's-your-secret-ingredient' Chili". Brendon had a great time telling people afterward that it was cilantro.
Mine won the "Best 'puts-hair-on-your-chest' Chili". I'm not sure what that means, but I'll take the prize, anyway!
I pretty much followed the ingredients from the other time that I did the white chili, with a few exceptions.
Dutch Oven White Chili
12" dutch oven
16-20 coals below
- 1 lb dry black eyed peas
- 1 lb bacon
- 1 large onion
- 2 cloves garlic
- 1 lb ground turkey
- 1-2 cups chicken stock
- 4 cups water
- 2 sweet peppers, diced (I like to use different colors, like yellow, orange, and red)
- 1/2 to 1 jalapeňo, diced, with seeds
- Salt and pepper to taste
- 4-5 green onion, chopped
- fresh cilantro, chopped
- More salt and pepper, if needed
- Juice of 1-2 limes, to taste
- ~1/4 cup corn masa
I started out the night before putting the black-eyed peas into a bowl with a lot of water to soak. It's important that there be a lot of water, because I've soaked beans before and had them completely absorb the water. So, flood 'em out!
In the afternoon, when it was time to start cooking, I fired up some coals and put the dutch oven on. The first step was to cook up the bacon. I cut it into one inch chunks and dropped it all in. It took a while, but once it was done, it hadn't rendered out that much grease, not like normal. So, I just added the sliced onions and the minced garlic to sautee.
Once those were good and carmelized, I moved that all to the sides and put the ground turkey in the middle to brown. When that was done, I stirred it all together.
This whole process probably took about 45 minutes, so I had to replenish the coals along the way.
Then, I drained off the murky water the beans had soaked in, and added the stock and the fresh water. I went ahead and measured the water as well, so that it was more accurate. I don't know that it mattered much, but I did.
At that point, I let it cook for quite a while. A couple of hours, really. I kept replenishing the coals, looking more for a steady simmer than a rolling boil. Once the beans were cooked soft, you can pretty much consider your chili "done", but I kept going. Partly because the chili cookoff was still an hour or so away, but also to get more simmering in on the flavors.
A word on the heat: I would recommend putting a half-jalapeno in the chili to start with, and then, after about 10-15 minutes of simmering, checking the taste. If it still needs more heat, then you can add it. That way, you can give it as much oomph as you like.
The final step was the last bits of flavoring and thickening. I like the corn meal is a great thickener in chili. It blends well with the southwest kinda feel of the meal.
One of the great things about chili is that it can be anything. That's one of the things this chili cookoff shows me each year. All these dishes, and they're all so unique and so different, and yet, they're all chili. What is it that makes them all "chili"? Some have meat, some don't. Some have beans, and some don't. Some are hot and some are sweet. Really, what is it that defines "chili"?
The cool thing about that is that you can really do almost anything. There's no reason not to jump in and try it, because you really can't screw it up!
Mark has discovered a love of Dutch Oven Cooking. Mark also has other sites and blogs, including MarkHansenMusic.com and his MoBoy blog.
Mark's Other Blog Posts: "Alleluia" Needs More Work, Hope for 2010,
Thursday, November 5, 2009
"Friendship" Fish Soup in a Dutch Oven
Now, sometime last summer (or it might have been last spring), he went fishing and gave me some of the fish he'd caught. He also made me some fish soup. Man, it was delicious! It was a mess to eat, though, because the fish was just cut up into chunks. It was gutted and scaled, but not filleted. So, you're eating the broth and the veggies with a spoon, an you're pulling the fish meat off the bones with your fingers, and it's a mess. Really, if you eat this stuff, you'll want to be with good friends, because it's a mess. Did I mention that?
So, because of that, and since it's his recipe and method, and since he gave me the fish, and since I invited him and his wife over to sample it tonight, I'm calling it "Friendship Fish Soup".
"Friendship" Fish Soup in a Dutch Oven
12" Dutch Oven
20-24 coals below
- 4-6 cups water
- 2-3 medium fish
- 4-5 medium onions, sliced
- 4-5 stalks celery, sliced
- 5-6 cloves garlic, sliced
- 1 small-medium zuchinni, quartered and sliced
- 4-5 medium carrots, sliced
- 1-2 green peppers, sliced
- 1 jalapeno, cored, seeded, and sliced
- Bay leaves
- Basil
- ~1/4 cup lemon juice, to taste
- ~1 Tbsp Salt, to taste
- Pepper to taste
This is really an easy dutch oven recipe to make. You slice up the veggies, you cut up the fish, you put it on the coals and you cook it.
Like I said, earlier, he gave me the fish last spring, so I gutted, scaled, cleaned them and then froze them. I just got them out in the early afternoon and let them thaw. I cut off the tails, and then cut the fish into 4 2-inch chunks. I put that in the dutch oven, bones, skin and all. I put in all the other ingredients, and put it on the coals, covered with the lid.
Really, you can do this with whatever veggies you've got on hand. I went really heavy on the onions, because I like a soup that's got some good veggie substance to it. Potatoes would have been another good one to add. Noodles or rice would have also worked. I like keeping the broth pretty clear, though, because you're gonna be sticking your fingers in it...
Every fifteen minutes or so, I'd check it and taste the broth. Add salt, pepper, and the seasonings you like as you would. I think I'd have added a bit more jalapeno, or only cored half the jalapeno I added, so there would've been a bit more heat.
I thought about going with some poultry stock to start with, instead of water, but I finally figured that we'd be making a great fish and veggie stock, so I just used water.
I really liked it. My wife wasn't as enthused by it, and didn't like the idea of picking fish bones out of her soup, so she only had the veggies. Still, we had a great time visiting with our friends, and I really like the recipe. Every once in a while, I make something that I like, even though hardly anyone else will.
Mark has discovered a love of Dutch Oven Cooking. Mark also has other sites and blogs, including MarkHansenMusic.com and his MoBoy blog.
Mark's Other Blog Posts: LDS Music Connecting, Mormons and Digg.com,5 Years of SOHOMan
Wednesday, August 12, 2009
Dutch Oven Chile Verde
OK, so I'm trying to figure out how to use chiles in my outdoor cooking. It seems to me that you can never fully tell just how hot something's going to be just by how many jalapeňos you add, right? I mean, the actual hotness varies, it seems. I put in one chile one day, and wow! It's way too hot, another day I put in three and it barely tickles. What's up with that?
OK, I'm exaggerating. A little. Still, I'm struggling, here. He'p me out!
I do know that cutting out the seeds and the veins that are inside of a chile pepper will make it much less hot. John over at Mormon Foodie, wrote a cool post about dried chilis. Good stuff.
The reason I bring all this up, is because I revisited an old favorite recipe the other day, one that I pulled from my outdoor cooking archive. Dutch Oven Chile Verde. I had eaten a smothered burrito at a small mom-n-pop Mexican place a few weeks back that was hotter than that one hot place that good Mormon boys aren't supposed to say. I swear this burrito bit me back. Man, it was good!
I kinda wanted to duplicate that sensation. But I failed miserably. I think it had a lot to do with the knowledge that my kids don't handle hot very well, and I knew that if it was a "3-alarmer", they wouldn't even touch it. So, I did back off a bit. But it also turned out that I backed off too much. It was pretty weak. Still, the family liked it, so I guess that's OK, right?
I also did some black beans in my 10", and some rice in my 8" dutch ovens.
Dutch Oven Chile Verde
12” dutch oven
Lots of coals below
Ingredients
- 1 yellow onion, chopped
- 2 Tbsp minced garlic
- 2 tablespoons olive oil
- 6 green onions, sliced (into the greens)
- 3 lbs lean pork, cubed
- 8 large tomatillo, husk peeled and coarsely chopped
- 1 cup chicken stock
- 2-3 mild anaheim chilis, sliced
- 1-3 jalapenos, sliced
- 2 teaspoons oregano
- 2 teaspoons ground sage
- 1 1/2 teaspoons ground cumin
- 1/4 cup chopped fresh cilantro
- Juice of 1-2 lemons
- 1/2 teaspoon salt (to taste)
- 1/4 teaspoon white pepper
- sprinkles of flour for thickening
The whole process started the night before, when I took out a half pound of black beans and set them in a bowl to soak.
The next day, when cookin' time came, I started up some coals and got the onions and garlic chopped while they were getting ready. I put the oil in the dutch oven, and got it good and hot. I've learned that's the secret to sauteeing. It's gotta be hot first.
While the onions were carmelizing, I cubed up the pork, from a roast we had in the freezer (thawed, of course), and added that to brown. Since the dutch oven was quite hot, it was easy to get a good brown singe on the pork. Yummmm....
I don't remember exactly how or when, but somewhere in all that, I changed the water on the beans, put them in my 10" dutch oven and put that on a lot of coals as well. I put the lid on and let that simmer and cook, adding coals all the while to keep it hot.
While that was going on, I got the tomatillos chopped and added them as well, with the chicken stock (which was stock that I made myself in my own dutch oven!). Once the tomatillos and the chicken stock was in, I put on the lid, and the rest of the time it cooked lid on, with only bottom heat.
Here's where what I actually did diverges from what I'm telling you I would do next time. Next time, I'd start by slicing up the anaheims and just adding them in, without de-seeding them. Then, I'd probably add one jalapeňo, also sliced, also without seeding, and I'd let that cook for about a half hour. While that was going on, I'd add all the herbs and spices in the next ingredient group. Much of the spices and herbs are being added, not so much by measure, but more by taste, by the way.
Then, after about a half hour, I'd taste it and see if it were hot enough. If so, great, just let it keep cookin'. If not, I'd add another jalapeňo, and let it cook for another half hour. I'd keep going like that until it was just as hot as I'd like it.
Then, once it's hot enough, I'd let it simmer for about another half hour or so. At that point, I'm back to where I was on Sunday. I set up my little 8" with a cup of rice and 2 cups of water, and put that on some coals to boil. This was also done with the lid on, and only bottom heat. I kept checking on the beans, and they were done right (with a bit of salt) and ready to go.
Dinner was served!
Mark has discovered a love of Dutch Oven Outdoor Cooking. Mark also has other sites and blogs, including MarkHansenMusic.com and his MoBoy blog.
Mark's Other Blog Posts: Family and Priesthood, Writing Great Content, Singing a New Song
Sunday, June 28, 2009
Dutch Oven Ham Recipes, Part II

One of the big changes I made was the orange juice. This ham soup recipe originally called for Sherry. I looked up some alcohol substitution charts online, and they all suggested orange juice for sherry. Having never tasted sherry, I don't know if that's a fair replacement. Still, it tasted good!
Other than soaking the beans, there's really not much to this dish. So, this one is also really good as a beginner dish, since it's really just a dump it in and cook it kinda meal.
Dutch Oven Ham and Black-Eyed Pea Soup
12" Dutch Oven
~15 coals below
- 1 lb black-eyed peas
- 3 Cups water
- 4 Cups chicken stock
- 1/2 cup orange juice
- 1 ham bone, with a lot of meat still on
- 1 medium onion, diced
- 4-5 stalks celery, chopped
- 1 bay leaf, crushed
- 2 garlic cloves, minced
- ~1/4 cup chopped fresh parsley
- 1-2 tsp chili powder
- salt & freshly ground black pepper, to taste
- A little flour to thicken, if desired
Like I said before, there's really not much to this ham recipe. The night before, I opened up the package of beans and put them in a bowl with lots of water. You need to do lots because the whole point is to have the beans soak it up. So, put in an inch plus or so of water higher than the beans.
The next day, drain the beans, and drop them into a dutch oven. Pour in the liquids, and drop in everything else. Because there's a lot of water, I used a lot of salt. It was very very yummy, especially with the french bread!
Wednesday, May 6, 2009
Dutch Oven Chicken Recipes, Part IV
This one's not really a recipe. It's more of a process that I go through whenever I do a roast chicken recipe. You're always left with this big hulking skeleton carcass, and what do you do with it? It's still got little chunks of meat on it that you couldn't get off with the carving knife, and you can't just leave it on the table and piece on it all night... It's nice to get just a little bit more out of the bird before it's all thrown away.
Here's what I do.
First, I usually just put it away for the night. If I've been cooking all day, as much fun as that is, I'm not up to cooking more. I'll wrap it up and put it in the fridge.
Then, the next day, I'll put it back in the dutch oven with about 8 or so cups of water. I'll put that on on some coals (usually 15-20), with the lid on, and let it boil. Once the coals start dying down, I'll just replenish them bit by bit, enough to keep it simmering, but it doesn't have to be boiling hard. Today, when I did this, I let it simmer for a couple of hours.
Then, when it's all done, I'll bring it in, and let it cool just a bit. I'm going to be working with it, and I don't want to burn myself in the process.
Much of the meat will have either boiled off the bones, or will be so loose that it's pretty easy to pull off with a fork. So, I'll start by cleaning off as much as I want, and scooping that out with a slotted spoon. That'll make a great chicken soup. Or sandwiches. Or enchiladas, or...
Now, I don't have a fancy strainer, or a filter, or anything like that. So, today I started by spooning off as much of the floating fat stuff as I could. Then, I got my baster out. I'd dip the tip down below the remaining fat and floating herbs level and suck up a tubefull, and empty that into a big measuring cup we have. I kept doing that until it was all done. The remaining fat, slime, and other solids got thrown away with the bones.
I let the measuring cup sit a little longer, just to let more fat separate out, and did the same game with the baster again. Only this time, I put the broth into sandwich-size ziplock baggies, and then into my freezer. I could get about 2 cups into each baggie. That'll be just about right to make some rice or start up a soup.
It's kinda cool to be able to get your own stock when a chicken recipe calls for it, or to get the right flavoring to start some other recipe. I like the way it carries with it some of the spices of the chicken recipe you cooked.
Thursday, April 30, 2009
Dutch Oven Chicken Recipes, Part II
OK, it's been a while, but here I am finally posting this recipe. This is what Steve, my friend, cooked at the Taste of Dutch a weekend or two ago. It was really delicious. The way he did it was a "dump meal", so this also qualifies as a great "Basic Dutching" recipe. It's very simple.
Dutch Oven Chicken Soup, with Rice
12" Dutch Oven
15-20 coals below
- 3 potatoes, cubed
- 2 carrots, sliced
- 2 celery stalks, sliced
- 1 c. cubed chicken, cooked
- 1 can tomatoes with liquid
- ¼ c. rice 1
- Tbsp. salt
- ½ tsp thyme
- ¼ tsp. Basil
- 1 bay leaf
- 1/8 tsp. Pepper
- 8 c. water
Put it all in the pot. Put it on the coals and bring it to boil. This will take a while, and it will be easier covered. Then, you'll pull off some coals, just enough to keep it simmering for 45 min. With all those veggies, and 8 cups of water, you could serve a lot of people with this dutch oven chicken soup.
Now, this is the recipe that he brought with him. It really tasted great. Here's a few suggestions for variations:
- Add a sliced up jalapeno. With this much stuff in the soup, one pepper will give it some zing without burning. To keep it tame, seed and core the jalapeno before you slice it.
- Lemon juice would give it a delicious Mediterranean flavor! If I were to do this, I'd give it as much as 1/4 to 1/2 cup, given the amount of water in this recipe.
- And, I, myself, would probably up the amount of chicken, just 'cause I like more and more chicken in my chicken soup.
Thanks, Steve, for coming along and for having a great time with us!
| ![]() |
![]() |
Sunday, March 15, 2009
Dutch Oven Seafood Chowder - Without a Net

What made it very interesting was that I made it without a recipe. With only my brainz as my guide. It was very exciting to fly without a net, so to speak, and to have it turn out so well.
I used the Roux base that Steven had shown me a few weeks ago, and just treated it a little bit differently, since I wasn't making a cheese sauce. I know, I know... Once I get a hold of something hot, I don't let up, do I?
Anyway, since I didn't have a recipe, I'm just going to talk you through it.
The first thing I did, after lighting up some coals, was get out one of my smaller dutch ovens and get it on top of about 15 coals or so, so it was getting good and hot. Into it, I put a half of a one-pound package of bacon, cut and separated into little squares. That started cooking.
Once that was going, I got out my 12" dutch oven, which was the one that I was going to do the actual chowder in, and got it on some coals, probably closer to 20. I had diced up some onions, and minced up some garlic (a couple of cloves) and I got that browning in that 12 dutch oven. At this point, there were no lids on, and, obviously, no coals on top.
While that was cooking, I was in the kitchen, quartering and slicing the potatoes, and slicing some celery. I did about four potatoes, and three or four stalks of celery.
Pretty soon, the bacon was nice and crisp, and the onions were starting to brown. It was a pretty cheap grade of bacon, so there was lots of grease left in the smaller dutch oven. I pulled the bacon out and put it in with the onions, and left the drippings. To that, I added some flour. You don't want to add it too quickly, because you could easily add too much. I added until it was a little runnier than cookie dough. I just let it cook.
I wanted to see what happened as you cook a roux longer and longer, so I let it go for a while. It gradually got more and more brown. Finally, I saw that it was getting nice and tanned, so I pulled that dutch oven off the coals.
In the meantime, the onions, garlic, and bacon were still browning nicely in the other dutch oven. I added a pint carton of cream, and about half that much of milk, maybe less. To help it to boil, I put the lid on.
Once it was boiling, I added the potatoes, the celery, and three little cans of seafood, with the liquid. I figured the seafood stock in the cans would enhance the flavor. Once it was boiling again, I added some of the roux, about a tablespoon at a time, stirring vigorously to break it up in the soup. I watched carefully after each tablespoonful of roux for a minute to check the thickness before adding more. If it goes too thick, I guess you can always just add more milk, but I don't want to catch myself adding and adding to catch up with myself over and over again.
Pretty soon, it's nice and thick, but still more of a soup than a sauce. You can make it how you like it.
At that point, I added some parsley, some salt and pepper (to taste on all three), and also some lemon juice. Then I pulled some of the coals out from under so that it would go from boil to simmer, and put the lid back on.
I would check it about every 15 minutes, just to check the taste and the done-ness of the potatoes. It didn't take long, maybe 45 minutes to be done.
While that was happening, I made some homemade bisquick and then some Red Lobster-style garlic cheese biscuits in another 12" dutch oven. I'll write about those tomorrow or Tuesday.
Monday, February 23, 2009
Getting Sauced with the Chicken Cordon Bleus

That's OK, though, it was a good thing!
My father was in town (from Indiana), and he was just visiting for a short time. Whenever he and/or mom are here in Utah, we always get together with my sister and Brother-in-law. Well, I've mentioned before that they are both great chefs and have worked in restaurants and are just plain incredible cooks. Amazing.

So, the next day, since they're coming over for dinner, I decide to do a chicken cordon bleu recipe, and make a cheddar cheese sauce using his instructions.
Well, they came out in time to see me put it all together, and he stepped me through the process. So, now I can do sauces and thick cream soups without fear!
But first, the chicken cordon bleu recipe
Dutch Oven Chicken Cordon Bleu
12" Dutch Oven
10 coals below
20 coals above (slightly less in warmer weather)
- 3-4 lbs boneless chicken breasts (thawed)
- a Brick of mozarella cheese, sliced
- A small block of cured meat (usually ham, but this time I used pastrami - turkey pastrami, since my brother-in-law's jewish and won't eat pork)
- A bowl full of well-crushed bread crumbs
- Liberal shakes of
- salt
- black pepper
- crushed cayenne pepper
- thyme
- sage
- And a little more salt and cayenne...
I started by mixing all of the spices in the second set of ingredients into the bread crumbs on a paper plate. Then, I pounded a chicken breast until it was spread out and flat. I put a slice of Mozarella in the center, and then a pretty thick slice of pastrami over that. If you get your pastrami pre-sliced, you'll probably want to fold over a couple of slices. Then I folded the edges of the pounded-out chicken over it. The cheese and the pastrami were small enough that I could fold the chicken around it and not have to secure it with a toothpick.
Then I picked it up, dredged it in the crumbs and spices, and put it into the bottom of an oiled dutch oven. Just as a side note, I used some of my chili and onion flavored oil!
I had a lot of chicken breasts, so I ended up packing them in there pretty tight.
Then, I just took them out and put them on the coals. I probably baked them for about 40 minutes or so.
I also took my 10" dutch oven and made some rice with some chicken stock, some lemon juice, and some chopped green onions (don't forget the salt and pepper)
The Sauce
8" Dutch Oven
A whole buncha coals below
- 1/2 - 3/4 cup of all-purpose flour
- 1 full stick of butter
- 1 cup cream
- 1 cup milk
- 2-3 tablespoons roux
- a sprinkle of nutmeg
- a few pinches of salt
- about 1/2 cup of grated cheddar cheese, maybe more.
We started by making the roux. Now, there are lots of different kinds of roux. Some are runny, some are cooked longer and are darker, but the one my bro-in-law taught me was pretty thick and very light.
First, he had me put a full stick of butter in the 8" dutch oven, on the coals. Once it had melted, we added a bit more than 1/2 cup of flour, and stirred it with a whisk. It almost had the consistency of sugar cookie dough. It would hold together as I was stirring it, but then would slowly flatten out when I stopped. I cooked it until it was a little darker than when it started, but still blonde.
We pulled that completely out of the dutch oven, and set it aside in a bowl. Since we didn't know just how thick we wanted the sauce to be, we were going to add it in later.
Then we put in the milk and the cream and set it to boil, with the nutmeg sprinkled in. Once it was boiling, we started adding roux, maybe a little under a tablespoon at a time, stirring it in with the whisk. In no time, we'd found the magic amount to get the right thickness. The rest of the roux, by the way, is sitting in my fridge, awaiting the next meal!
Then, as it boiled again, we added the cheese. This time, the cheese melted, and bonded with the flour, and it made a great sacue. It didn't "break" and end up in a coagulated clump in the bottom of the dutch oven. We added some salt to taste, and away we went! We also added some of the chicken stock from the bottom of the cordon bleu dutch oven, too! Yum!
So, the full meal was: The Chicken Cordon Bleu, on the rice, with the Cheese Sauce on top. The chicken and the rice would have been great by themselves, but that sauce really took it to a whole new level. It really made the meal! And it was very simple.
And then, he explained some other things, like, with that same base, but with more milk, and sauteed mushrooms, onions, and celery, you have cream of mushroom soup! With tomatoes, you have cream of tomato soup! With asiago and parmesan cheese, instead of cheddar, you have alfredo sauce. And so on, and so on... Sauces and soups from the same base. Amazing!

It also goes to show that learning to cook in a dutch oven is really all about learning to cook. In a dutch oven.
Monday, January 5, 2009
Dutch Oven Venison Stew (Elk)
Another was that a bit of vinegar can help counteract that "gamey" taste. You can overdo it, it's true, but a touch would help mellow that out.
So, here it is!
Dutch Oven Venison Stew
12" shallow dutch oven
- 2-3 medium onions, sliced
- 2-3 cloves of garlic, minced
- 1-2 lbs red game meat (like I mentioned, I used elk)
- 1 can (about a cup and a half) beef broth
- 4-5 stalks celery, chopped
- 3 large potatoes, quartered and sliced
- 1 jalapeno, chopped
- 1 cup of carrots (baby or sliced)
- lots of chopped fresh parsley
- About a quarter cup of vinegar (I used red wine vinegar)
- Salt
- Black pepper
- 3-5 Tablespoons flour
Some other things you could add, if you wanna:
- Chopped green onions
- a can of diced tomatoes
Making it was pretty easy. In fact, the hardest part was getting the coals lit in the cold wind. Especially since I was out of lighter fluid. I was forced to use - ummm - stronger stuff. Don't tell my kids that I used some drizzles from our lawn mower canister...
Anyway, it got lit (quite spectacularly, I might add), and I scattered some coals below. I put some olive oil in the dutch oven and put it on the coals to heat up. I added the onions and the garlic to brown. Then, I added the meat to brown. Then, I added everything else, except the flour. That was added and stirred in later.
From there, I just cooked it with about 15 or so coals below, and the same number above. I just let it boil and simmer for about 2-3 hours. The potatoes and the carrots were soft, the flavors were all the way through the broth and the meat. Then I added the flour to thicken it up.
It was great!
Saturday, October 11, 2008
Dutch Oven Basics: Beef Stew with Everything

That got me thinking. I know a lot of really good, really simple recipes and I ought to put together a series of posts on them.
I did some digging and came up with some recipes in three categories:
- One-pot, one-step meals: These are dishes that are full and hearty, and simple to do. You assemble the ingredients right in the dutch oven, and put it on the coals and cook it. Simple, clean, easy.
- Two-step meals: These are dishes that have an extra preparatory step. You might have to brown the meat before adding all the other ingredients, for example. You might have to cook something in one pot, then add more to it for the final cooking.
- Easy breads: Breads have lots of steps, and are tricky to cook. So I made a category of their own for this.
Even though I’m trying to keep things simple, I’m also trying to make them as much “from scratch” as possible. It’s easy to pour ingredients from cans and heat them up, but I find it much more satisfying to go deep and make it as much on my own as possible.
I also want to dispel the idea that “simple” is “bland”. You can still take easy dishes with few steps and with some cool spices and flavors, make them really elegant and special.
So, my plan is, over the few months or so, to do a lot of these dishes from these categories. I’ll share them here, obviously, and hopefully, give the dutch oven beginners a chance to find some yummy things to cook, and even impress their friends with. I’m also hoping that we can get some dialog going on here. I’m hoping that some of the dutch oven chefs with some real experience will also pop in and add their ideas in the comments. Hopefully we can all learn, here.
So, the first entry is: Dutch Oven Beef Stew with Everything!
12” Dutch Oven
18-20 coals below
- 2 capfuls (or shakes) of oil
- 1-2 lbs stew beef
- 2 medium to large potatoes, quartered and sliced
- 1 cup sliced mushrooms
- 2 sweet peppers, chopped. (I like to choose a green and one of a different color, like red or yellow. It adds color and a slightly different flavor)
- 1 large carrot, sliced
- 1-2 celery stalks, sliced
- 2 medium tomatoes, chopped
- 1 jalapeno, seeded, cored, and sliced.
- ½ tbsp crushed bay leaves (or crumble a few whole leaves)
- 1 tbsp parsley
- ½ tbsp thyme
- 2 tbsp minced garlic
- Some liberal shakes (maybe 1/6 cup) balsamic vinegar
- 1 14 oz can beef broth
- Salt
- Pepper
- 2 tbsp flour (added at the end)
This is one of those in category one. A one-pot, one-step meal. Sometimes I call these "dump meals", because you just dump it all in the dutch oven and cook it!
I started by lighting up about 25 or so coals. While those were heating up, I came back inside. I put a little bit of oil at the bottom of the 12” dutch oven, with the stew meat. Then I started chopping and slicing veggies. I just added everything into the dutch oven directly, stirring it up as I went. You can really make this with just about any veggies you happen to have in the fridge. I think the only ones that are “required” are the potatoes and the onions. Well, maybe the carrots.
Then, with all the veggies in, and the meat in, I poured in the can of broth, and added the salt and pepper. I’d keep adding salt and pepper throughout the cooking process.
It doesn’t really matter what order you put things in. It’s all going into the same pot, and then it gets added to the heat.
…Which was the next step. I took it outside onto the front porch (it had looked like rain, and my froth porch is covered). I spread out about 18 to 20 coals on my cooking area (a small metal table), and set the dutch oven on top of it. Within 15 to 20 minutes it was boiling, and so I removed a few coals (maybe 4 or so), to reduce the heat a little. I still had some coals going in my side fire, and I would add some to it from the bag from time to time to be able to have hot ones to replenish the ones under the dutch oven.
Every half hour or so, I’d open it up and stir it. Having that much liquid, and cooking mainly from the bottom makes this dish an easy one to learn on, since regulating the heat isn’t that tricky. As the coals die down, add new ones from your side fire. The total cooking time was probably an hour and a half to two hours. My gauge is the potatoes. When they’re done, I’m safe, and I cook it a bit longer just for more flavors.
Just at the end, I added the flour as a thickener. I imagine that I could have added it at the beginning, and it probably would have been OK, but I think it maintains the thickness better. I’ve heard that tapioca powder is a really good thickener, and it can be added at the beginning.
This is a yummy basic stew. To pick this up a bit, and take it to another level, put the dutch oven on the coals with just the oil. Let it heat up a bit, then brown the meat, the onions, the garlic, and the mushrooms. Then add everything else. Also, when you serve it, garnish it with a few crumbs of feta cheese!