So, I read over here: http://edible-wasatch.ppwd.stackablehost.com/edible-utah-events/eatlocalweek that this week is "Eat Local" week. It's a week of events, mostly in the Salt Lake City Metro area, designed to raise awareness of and to celebrate the "Local Food Movement". The idea is to try and eat foods that were produced within 250 miles of your home.
I'm not one to jump in on food movements. I'll occasionally make a meal that's vegetarian, and I like to shop at farmer's markets and I've even been in a food co-op from time to time. I'm fascinated by deconstruction, and even molecular gastronomy. I love to explore the world's food.
But even with all that. I'm not really committed to any one of them. Except cooking them outdoors, or in Dutch ovens. I pretty much stick with that. It's kinda my schtick.
The local food movement is something, however, that I've always liked. As I said, I love shopping at farmer's markets, and I like getting things from the roadside stands that are all over Utah in the later summer and early fall. I think it's great to buy from smaller local farms. Here are some thoughts.
1 - When you shop for local food, you never really know what you'll get, and shopping is a bit of an adventure. Sometimes, I'll go there without an idea of what I want to cook. Then, I get my ideas from what I see. I think that's a lot of fun. Sometimes, what you get is more flavorful and colorful than the supermarket competition. Other times, it's on par. It's that variability that ads flair, I think.
2 - I was in a larger supermarket, a Smith's, the other day, and saw that they were putting up displays that celebrate local food. In the produce section, for example, next to some of the veggies, were pictures of the farmers that had produced what was in the bin. So, sometimes you can get local with the convenience of the supermarket.
3 - I remember one time last summer, I stopped off at a street corner produce stand, and in talking with them, found out that the corn they were selling had been trucked in from California the night before. Local food? Not so much...
Overall, I think it's a great idea. In the past, I've tried to shop local food whenever it was easy and convenient. I think that, in the future, I'll make a broader effort to include local foods in my ingredients and mention that whenever I can in the blog. You know, food trends come and go, but I think this is one worth building on.

Monday, October 7, 2013


Thursday, October 3, 2013
Dutch Oven Soft Dinner Rolls

Or, in this case, still not quite not there...
Dutch Oven Soft Dinner Rolls
10" Dutch Oven
10 Coals below
20-22 coals above
2 tsp yeast (or 1pkg}
I/4 cup warm water (105°F-110°F)
1/2 Tbsp sugar
1 cup milk, just to scalding hot (do not simmer or boil)
¼ cup melted butter
4 cup bread flour
1 tsp salt
1 egg, lightly beaten
2 T butter, melted, for brushing
The process for these rolls was very similar to my standard process for bread, with a few changes. I started out by activating the yeast in a bowl with the warm water and the sugar. I set that aside to get frothy for about 10 minutes or so.
Then, I heated up the milk and the butter. If I'd been out in the wild, I could've done this in a dutch oven, like my 8", over about 12 coals, but since I was in a bit of a hurry, I did it in the microwave. May the Gods of Iron forgive me.
I sifted the bread flour into a mixing bowl, and added the salt and the egg. I stirred in the yeast mix and the milk mix. It was pretty sticky still. When I turned it out on the table and started kneading, I didn't add much flour on the table. I wanted it to be a pretty wet dough, to make it lighter. Not quite so wet as the no-knead or a ciabatta/focacia dough, but definitely more loose than a regular sandwich bread as well. I kneaded it to a good windowpane. Then I oiled the bowl, and set the dough aside, covered, to rise.
I let it rise a bit higher than normal, in both the first and second fermentations.
After the first rise, I cut it into eighths and rolled each piece into a small ball. I set these into the base of my oiled 10" Dutch oven. I set these aside to rise, while I lit up some coals. Once the coals were ready, I put about 20-25 of them on the lid of the Dutch oven, to preheat. After about 15-20 minutes of heating, the rolls had risen well. I took them out and set up the coals as listed above, and started the baking.
After about 15 minutes, I turned the lid and the oven, and set the thermometer in the dough. They had sprung up nicely, and were just starting to brown. About 10 minutes later, the thermometer read about 190, and they were ready to come off the coals.
I brought them in, turned them out of the Dutch oven, and set them on a cooling rack. While they were still hot, I coated the top with some butter, which immediately melted onto the crust. Then they cooled while I cooked the rest of the dinner.
As I said before, they were lighter than most loaves I'd done, but not quite the airiness I was shooting for. I think that making the dough wetter helped, as well as the extra rise time. I also think baking to 190 instead of 200 was a part of that as well.
Wednesday, October 2, 2013
Dutch Oven Pork Loin Medallions
Or
Cooking for Fun!
 I've been so busy lately doing signings, appearances, and demos for my books, especially the new one, that I've forgotten how much fun it is to just cook for the family. I'd forgotten how much I enjoy looking forward to trying something new, that I've never done before. It's truly been a long time.
So, this last weekend, I kinda went over board.
My sister-in-law had given us a frozen pork loin, and I'd been going over in my head what I could do with it. I finally came up with this idea, and when we had to cancel on a birthday party because of car troubles, I jumped at the chance.
But, my dear wife asked if I could make some au gratin potatoes. And some dinner rolls. And I thought it would be cool to round out the meal with a dessert, like brownies!
I ended up doing all four dishes in my Dutch ovens. It was kinda hectic, but the results were sure worth it! Yummy to the core! The potatoes and the brownies already have their recipes enshrined here in the musty pages of the Black Pot Blog, but the rolls and the pork loin do not! Here is the latter, first:
Dutch Oven Pork Loin Medallions
1x 12" shallow Dutch oven
20-24 coals underneath
Liberal shakes of:
Salt
Pepper
paprika
thyme
basil
1 Pork Loin
1 lb Bacon
Juice of 1 lemon
~1/4 cup water
1 heaping Tbsp flour
There really isn't much to this recipe. It's very simple, and the cool thing is that it looks very impressive. Start early in the day by getting the loin thawed under cool water.
I actually made this dish pretty late in the day. I cooked and baked all of the other dishes first, because this one takes the least amount of time and it's the most critical to be served freshest. The first thing to do is to make sure that you have some fresh coals lit.
Then, I mixed up generous amounts of each of the spices. I just kept tasting it with my fingertip until it seemed like the right blend. You can actually use whatever seasonings and herbs you want. This combination turned out really good. I just mixed it in a small bowl.
 The loin came out of the package in two halves. I cut each one into quarters, which were about 2-2 1/2 inches long, then butterflied each piece. To butterfly, slice the piece in half, against the grain, but don't cut all the way through. Almost, but not completely. Then, open the slice up like a book and you have a disc of meat. I lightly dredged the top and the bottom in the seasoning mix. Then I took a single strip of bacon and wrapped it around the side, securing it with a couple of toothpicks. I continued until all the meat was butterflied, seasoned, and wrapped. While it was absorbing the seasonings, I got the oven ready.
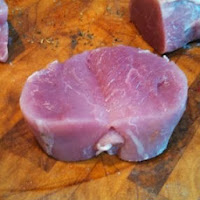 I spread out some coals and set my 12" oven on them. I sprinkled just a little bit of olive oil in the bottom and let it get all shimmery hot. Then, I gently laid each wrapped medallion on the hot oven bottom. After 5-10 minutes, I turned them over and let them cook/sear on the other side. About this time, I put the lid on, so that the internal heat would also cook the meat through. I'm not sure that I needed to do that, though.
When they were done through, I pulled them off and put them on a plate, tented in aluminum foil. I squeezed the lemon juice into the bottom of the pan, and began scraping loose the fond pieces. There was some liquid from the pork in the bottom as well, so that helped. I added the flour to the water and stirred it thoroughly, and then began adding that into the pot to thicken and smooth the juices into a pan sauce.
In the end, I served the medallions up with the potatoes and the rolls, drizzled with just a little hint of sauce. It was truly elegant and delicious!
Cooking for Fun!

So, this last weekend, I kinda went over board.
My sister-in-law had given us a frozen pork loin, and I'd been going over in my head what I could do with it. I finally came up with this idea, and when we had to cancel on a birthday party because of car troubles, I jumped at the chance.
But, my dear wife asked if I could make some au gratin potatoes. And some dinner rolls. And I thought it would be cool to round out the meal with a dessert, like brownies!
I ended up doing all four dishes in my Dutch ovens. It was kinda hectic, but the results were sure worth it! Yummy to the core! The potatoes and the brownies already have their recipes enshrined here in the musty pages of the Black Pot Blog, but the rolls and the pork loin do not! Here is the latter, first:
Dutch Oven Pork Loin Medallions
1x 12" shallow Dutch oven
20-24 coals underneath
Liberal shakes of:
Salt
Pepper
paprika
thyme
basil
1 Pork Loin
1 lb Bacon
Juice of 1 lemon
~1/4 cup water
1 heaping Tbsp flour
There really isn't much to this recipe. It's very simple, and the cool thing is that it looks very impressive. Start early in the day by getting the loin thawed under cool water.
I actually made this dish pretty late in the day. I cooked and baked all of the other dishes first, because this one takes the least amount of time and it's the most critical to be served freshest. The first thing to do is to make sure that you have some fresh coals lit.
Then, I mixed up generous amounts of each of the spices. I just kept tasting it with my fingertip until it seemed like the right blend. You can actually use whatever seasonings and herbs you want. This combination turned out really good. I just mixed it in a small bowl.

 I spread out some coals and set my 12" oven on them. I sprinkled just a little bit of olive oil in the bottom and let it get all shimmery hot. Then, I gently laid each wrapped medallion on the hot oven bottom. After 5-10 minutes, I turned them over and let them cook/sear on the other side. About this time, I put the lid on, so that the internal heat would also cook the meat through. I'm not sure that I needed to do that, though.
When they were done through, I pulled them off and put them on a plate, tented in aluminum foil. I squeezed the lemon juice into the bottom of the pan, and began scraping loose the fond pieces. There was some liquid from the pork in the bottom as well, so that helped. I added the flour to the water and stirred it thoroughly, and then began adding that into the pot to thicken and smooth the juices into a pan sauce.
In the end, I served the medallions up with the potatoes and the rolls, drizzled with just a little hint of sauce. It was truly elegant and delicious!
Subscribe to:
Posts (Atom)
LinkWithin
