Sunday, May 27, 2007

Dutchin' for the Folks!

My parents came into town last week, and today I got the chance to cook for them. I really enjoy cooking for myself and my family, but there’s something really cool about sharing that with others. It’s a little bit service, a little bit showing off, a little bit stressful, and a little bit relaxing.

One of the most “gourmet” of dishes that I’ve made is my lemon salmon and rice. It’s a recipe that I created from a recipe for baked chicken and rice that I found in a DO cookbook somewhere. It’s one of those dishes that looks great when it’s all put together before you bake it, and looks even better when it’s all done.

I’m also preparing for my first DO cookoff, to happen next weekend here in Eagle Mountain. I have no idea what to expect, since I’ve never, ever done one of these things before. I’ve never done a gathering, nor a competition. I’ve pretty much cooked it all and learned it all on my own. So, I’m excited to see how other people do it, to see if I’m doing it “right”!

In the cookoff, I have to do two dishes: an entrée, and a bread. So, I tried it today. I tried to break down all the steps so that I could have both be done at about the same time, but that didn’t work out. But at least, both tasted great.

Baked Salmon and Rice

12” DO

8-9 coals below
16 coals above

3-5 Good sized portions of salmon (1 for each person eating)
1 1/2 Cups Rice
2 1/2 Cups chicken broth
2 cans Cream of Mushroom Soup
2 medium onions
1/2 cup mushrooms
2 stalks celery, sliced
chopped fresh parsley
1 tsp chopped garlic
1 lemon, sliced
black pepper (preferably coarse ground, or, better, fresh ground)
Salt
Butter

  1. Pour rice and broth into a 12” DO. Mix in the Cream of Mushroom soup (It doesn’t need to be well blended).
  2. Mix the onions, mushrooms, celery, and garlic together, and layer on top of the rice.
  3. Lay the fish on top of the veggies in a circle.
  4. Slice the lemon and put one or two slices on top of each piece of fish. Put about a half tbsp of butter on each fish piece.
  5. Salt and pepper (I like it pretty liberal with the pepper). Sprinkle in the parsley, and I like a spritz or two of Worcestershire sauce.
  6. Bake at 350 until meat and rice are done (about 40 min to 1 hr). The fish will be steamed. The juice cells in the lemons will burst and drip lemon juice down into the fish. Yummmmm


Then, along side of that, I baked these rolls (they’re adapted from a recipe in a DO cookbook. The book makes it all garlic with parmesan, but I just make the rolls. They’re really good that way):


Amazing Rolls

12” DO (I used my deep one)

7 coals underneath
14 coals above


1 tbsp yeast
½ cup warm water
1 cup melted butter (melt a half cup first, then another half later on)
½ cup sugar
2 eggs
1 tsp salt
1 cup milk
5+ cups flour

  1. Mix the yeast and the water, and let it stand for 15 minutes or so, letting it activate the yeast and foam up.
  2. In your mixing bowl, add ½ cup of the melted butter, the eggs, the sugar, and the salt.
  3. Add the milk, and stir it all up
  4. Add the yeast & water, stir that all up.
  5. Add 5 cups of flour, stirring as you go to make a smooth dough ball. Then add more as needed to get the right consistency. The original recipe didn’t say to, but I kneaded it in the bowl for five minutes or so.
  6. Cover the dough with a damp cloth, and set the mixing bowl somewhere warm (in the summer, I just use the back porch) for a couple of hours. Let the dough ball double in bulk.
  7. Then, I break off chunks somewhere between the size of a golf ball and a tennis ball, and arrange them in the bottom of a greased DO.
  8. spread the other ½ cup of melted butter liberally over the dough balls
  9. Bake for about an hour with the suggested coals.


The tricky part about baking, I’ve discovered, is heat management. It’s got to be hot, but if it’s too hot, then it burns above and below, and is still doughy in the middle. If it’s not hot enough, it never cooks at all. The sad thing is, I don’t think you can learn how to regulate it by reading a blog. The only way is to try it on your own, following the directions as close as you can, and see if it works. It took me three tries to make good bread. Fortunately, this recipe was one of the winners!

(Extra note, added later: Any time you're cooking more that 45 minutes or so, I've found that I'll have to add more coals. I keep a stack of burning briquettes off to the side of my cooking area and replenish it by 4-5 coals at a time, just to keep a good fresh supply and maintain the heat on the ovens.)

It IS critical to turn the oven every 15 minutes or so. Just lift the oven by the wire and turn it about a quarter turn, then turn the lid a quarter turn back the other direction. This assures that the bread isn’t over or under the same hot spots for the whole baking period. Another thing I did was to cook the last fifteen or so minutes with top heat only.

I’m not sure how to describe these rolls, but they’re a little bit denser than normal, and the flavor is really sweet.

My folks loved it! Hope yours do, too!

Saturday, May 26, 2007

PizzaRice!

I’ve been wanting to try this one for a long, long time, but a lot of things got in the way. First, I had a hard time finding the pesto sauce. Then, I was missing this or that ingredient, or I didn’t have time to cook, etc…

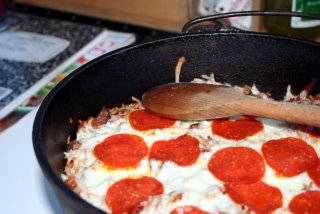
But the idea just seemed so bizarre-ly cool that I had to try it. I originally saw it at the “Round the Chuck Box” blog, and here is the direct link. The picture below is his, but mine turned out looking pretty much the same.

I just shortened the name from “Deep Dish Pizza Rice Entrée” to: “Pizzarice”. I did tweak the recipe a bit, too.

Pizzarice
10” DO
6 briquettes under, 13-15 above, once the baking begins

8 ounces Italian sausage
1 cup chopped onion
2 cloves garlic, minced
1-1/2 cups long-grain rice
4 ounces sliced pepperoni, cut into quarters
1/2 cup sun-dried tomato pesto
1 teaspoon dried oregano
2-1/2 cups chicken broth
1-1/2 cups shredded mozzarella cheese
Some more ordinary round pepperoni slices

I started by arranging a lot of briquettes under my 10” and a little less under my 8”. In the 8”, I put 2.5 cups of water, to heat or boil to dissolve a couple of chicken bullion cubes into.

In the 10”, I crumbled the sausage and started cooking it. I like to use mild or medium sausage. I like hot sausage, but in dishes I’ve found that hot tends to overpower the rest of the flavors, and all you taste is sausage. In this case, I couldn’t find any medium, so I got mild. For Italian recipes, I like Italian sausage better than ordinary pork breakfast sausage. But use whatcha got.

Once the sausage was cooked, I added the garlic and the onions and cooked those until they were translucent.

By this time, the water was hot enough to dissolve the bullion cubes. So, I pulled the 10” off the coals and added the rice. I stirred it to coat the rice in oil. I don’t know why. The recipe said so. Maybe some of you know and can tell me why.

Then I added the broth, the pesto sauce, and the pepperoni chips. Oops. I just realized I forgot the oregano. Oh, well, the recipe says you should add it at this point. Then, I stirred it all up.

I set up the coals as above and put it on for about 20 minutes. At that point, I spread on the mozzarella (actually I bought a shredded blend of pizza cheeses, including provolone, romano, and parmesan as well as mozzarella), and I topped that with some more pepperoni rounds.

Back on the coals for about another 10 minutes, and we’re good to go!

Wow, that’s good! I’ve had a little trouble with rice dishes of late. This one is cooked perfectly. I think my troubles have been not enough liquid for the rice to absorb.

Tomorrow, my parents are coming over, along with my Dad’s brother, and my mom’s sister. What’s on the iron? Lemon salmon on rice, with rolls on the side! Oh, yeah…

Sunday, May 20, 2007

Two New Recipes, One in the Wild!

We got two entries in the blog this week. That’s OK, because it’s been a while since I cooked.

Friday night, our church had what’s called a “Father’s and Sons Campout”. As the name implies, all the dads in the ward take all their sons camping, to the same location. Great time to spend together. Since Jodi was out of town over the weekend, it was good timing, too.

After I got the tent set up, I pulled out the DO, my original 12”-er, and started cooking. I made an old favorite of mine.

Mark’s WOW Layered Meatloaf

12” DO
8-9 coals below
16 coals above

The basic meatloaf:
1 1/2 lb ground beef
1 large onion, chopped
½ cup bread crumbs (or better, crushed crackers or croutons)
2 eggs
Catsup or BBQ sauce to taste
Salt, Pepper, Worcestershire to taste

The other layers:
1 lb medium pork sausage
About 2 cups grated cheddar (I like sharp cheddar, but it’s also good with other yellow cheeses, like Colby or CoJack)

Mix the ground beef, onion, bread crumbs, eggs, sauces, and spices. You could actually use your own favorite meatloaf recipe if you prefer. Divide it in half.

Spread one half of the beef meatloaf mixture in the bottom of the DO. Don’t worry about greasing the bottom, it’ll be plenty greasy on it’s own. Sprinkle a layer of Cheddar. Spread the sausage, then another layer of cheddar. Spread a top layer of meatloaf mixture and then a last sprinkling of cheddar.

Bake, and make sure to turn the oven and the lid about every 15-20 minutes to keep from burning. It goes about an hour. While it’s the best tasting Meatloaf I’ve ever eaten, it’s NOT lowfat! I spoon off the drippings before serving.

This is actually the first time I’ve gotten to cook this “in the wild” so to speak. And actually, it's only the second time I've cooked that way at all. Most of the time it's safe on my back porch, bringing things out from the kitchen. In the woods, it’s kinda tricky, because there’s no table to chop up the onions on, or anything. You just gotta improvise.


This is actually the second time I’ve made this meatloaf, and I really didn’t alter the recipe from the first time. Well, not true. The first time, the sausage was hot, and, while I like hot sausage, I found it overpowered the tastes of the other meat. So, I went with medium this time.

I got some pics, to, and this time, they were shot with a real camera, so they look a lot better.


LinkWithin

Related Posts with Thumbnails